#react router query parameters
Explore tagged Tumblr posts
Visit Tumblr Blog
Explore Tumblr blogs with no restrictions, modern design and the best experience.
Last Seen Tumblr Blogs


Fun Fact
Tumblr.com is the 103rd most visited website in the world.
Text
Importance of React Router Properties
Hey Tumblr friends! 🌟 Today, let's dive into the essentials of React Router, the go-to library for routing in React applications. Here's a snapshot of React Router & its key properties:
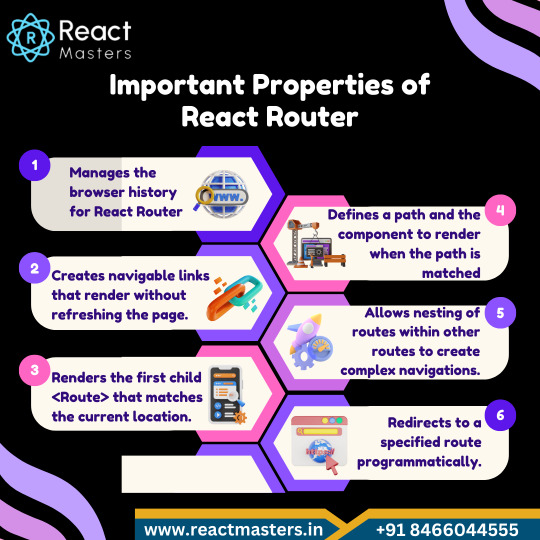
Declarative Routing 📝
Define routes using JSX, making your routing logic intuitive and readable.
Dynamic Routing 🚀
Handle dynamic segments in your URL, perfect for user profiles or product pages.
Nested Routes 🌳
Organize your routes in a hierarchical manner, mirroring your app's structure.
Route Matching 🔍
React Router matches routes intelligently, offering flexibility with exact and partial matches.
History Management 🕰️
Seamlessly integrates with browser history, enabling navigation controls like back and forward.
URL Parameters & Query Strings 🔗
Pass data through the URL, making your app's state sharable and bookmarkable.
Redirection & Authentication 🔒
Easily manage access control and redirection, crucial for protected routes.
React Router transforms how we navigate React apps, making routing clear and powerful. Whether you're building a simple site or a complex web app, it’s a must-have in your toolkit! 🛠️💖
#react js online training#reactjscourse#reactnativecourse#reactnative#react course#web development#job support#placement service#react router
1 note
·
View note
Text
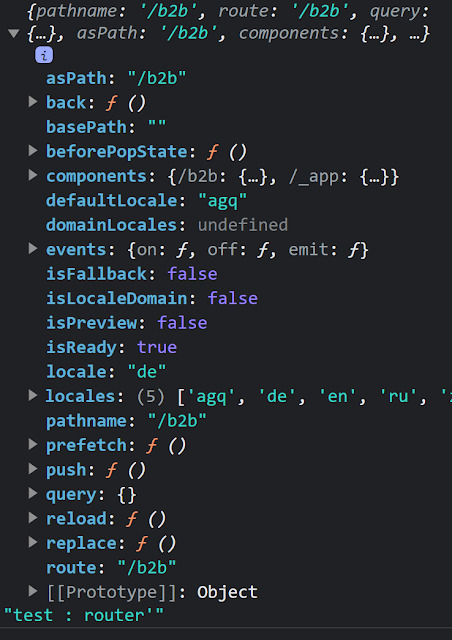
Next.js Router asPath, query, and route: The Difference

Next.js is a popular framework that allows developers to build modern and efficient web applications quickly using React. The routing system in Next.js enables navigation between different pages within the application. asPath, query, and route are important concepts in the Next.js router. In this article, we will delve into their differences and understand their respective purposes.
Table of Contents
Overview of Next.js Router Introduction to asPath Introduction to query Introduction to route Differences between asPath and query Differences between asPath and route Differences between query and route Use Cases of asPath, query, and route Considerations Conclusion Frequently Asked Questions (FAQs)
1. Overview of Next.js Router
The routing system in Next.js facilitates page navigation within Next.js applications. The router renders the corresponding page based on the URL path and allows dynamic data passing and manipulation as required.
Next.js Doc https://nextjs.org/docs/pages/building-your-application/routing
2. Introduction to asPath
asPath is a property of the Next.js router that represents the complete URL path of the current page. This path may include query parameters and fragments. It is represented as a string and is useful for handling the current path within the page.
3. Introduction to query
query is another property of the Next.js router that represents the query parameters of the current page. Query parameters are appended to the URL path and follow the format of key=value. The query object contains key-value pairs of the query parameters and allows for passing dynamic data to the page.
4. Introduction to route
route is a property of the Next.js router that represents the path of the current page. This path corresponds to the file path within the pages directory and remains identifiable even with dynamic routing applied.
5. Differences between asPath and query
Both asPath and query provide information about the URL of the current page, but they differ in terms of usage and the format of the returned value. asPath returns the complete URL path as a string, including any query parameters. On the other hand, query returns the query parameters as an object. Therefore, asPath is useful when dealing with the complete path, while query is useful when handling individual query parameters.
6. Differences between asPath and route
Both asPath and route provide information about the path of the current page, but they differ in terms of the format of the returned value and their usage purposes. asPath returns the complete URL path as a string and is primarily used for handling the current path within the page. On the other hand, route corresponds to the file path within the pages directory and remains identifiable even with dynamic routing.
7. Differences between query and route
Both query and route provide information about the path of the current page, but they differ in terms of the format of the returned value and their usage purposes. query returns the query parameters as an object and is primarily used for passing and handling dynamic data. On the other hand, route corresponds to the file path within the pages directory and is primarily used for retrieving static information about the page.
8. Use Cases of asPath, query, and route
asPath: Useful when conditionally rendering specific components based on the current path or retrieving different data. query: Useful for passing and processing dynamic data to the page using query parameters. route: Useful for retrieving static information about the page or conditionally rendering different components based on the path.
9. Considerations
When using router properties in Next.js, it is important to be mindful of their usage. Improper usage or misuse of these properties can lead to unexpected behavior in the application. Therefore, it is crucial to refer to the documentation and examples and implement them carefully.
10. Conclusion
In this article, we explored the differences between asPath, query, and route in the Next.js router. Each property provides information about the path of the current page and serves different purposes. Understanding their characteristics and usage is essential for effectively managing the routing system in Next.js applications.
11. Frequently Asked Questions (FAQs)
Q1. What is the difference between asPath and route? asPath returns the complete URL path of the current page, while route returns the file path within the pages directory. Therefore, asPath is used for handling URL paths, while route is used for retrieving static information about the page. Q2. What is the difference between query and route? query returns the query parameters of the current page as an object, while route returns the file path within the pages directory. query is used for passing and handling dynamic data, while route is used for retrieving static information about the page. Q3. Can asPath, query, and route be used together? Yes, asPath, query, and route can be used together based on their respective purposes. For example, you can use asPath to get the current path, query to pass dynamic data, and route to retrieve static information about the page. Q4. What should I consider when using Next.js router properties? When using Next.js router properties, it is important to refer to the documentation and examples and implement them correctly. Improper usage can lead to unexpected behavior in the application. Q5. How can I leverage Next.js router properties? Next.js router properties can be leveraged for page navigation, passing dynamic data, conditionally rendering components, and more. Understanding their differences and purposes will help you effectively develop web applications using Next.js. Link : https://worldgoit.com/archives/posts/software-development/next-js-router-aspath-query-and-route-the-difference/ Read the full article
0 notes
Text
Making Complex Queries Simple with React Query
As a developer, one of the most important skills you can learn is how to write complex queries. With the React Query library, you can easily write complex queries without having to worry about the underlying data structure. The library provides a simple API that allows you to declaratively specify the data you want to fetch, and it handles all the details for you.
With React Query, you can easily fetch data from multiple sources, including a server, a database, and even a file system. The library provides a unified interface for retrieving data, so you don't have to worry about the differences between different data sources.
React Query makes it easy to handle errors and timeouts. If a request fails, React Query will automatically retry the request. If the request takes too long, React Query will cancel the request and return an error.

How React Query Helps Make Queries Easier
Querying data is a fundamental part of any web or mobile application. React Query is a new library that helps make queries easier, faster, and more reliable. In this blog post, we'll explore how React Query can help you write better queries, and how it can make your app more responsive and reliable.
Before we dive into React Query, let's take a step back and look at the problem it's solving. When you're building an app, you need to be able to fetch data from a server, and often that data needs to be filtered or sorted in some way. This data can be in the form of records, like users or products, or it can be in the form of aggregated data, like the number of likes on a post.
The difficulty with fetching data is that it can be slow, and it can often fail. If your app depends on data that's slow to load, or that fails to load often, your users are going to have a bad experience.
When you use React Query, you define your queries using special helpers. For example, if you want to fetch a list of users, you would use the query helper like this:
query({
queryKey: 'users',
variables: {},
config: {
// ...
}
})
This helper returns a query object, which you can use to subscribe to the data that's being returned by the query. The query object has a number of methods that let you get the data that's been returned, or that let you update the query.
Setting Up React Query in Your React Application
In this post, we'll go over how to get started with React Query and set it up in your React application.
React Query is a library for fetching and managing data in React applications. It is designed to make it easy to fetch data from an API and keep that data synchronized with your component state.
To use React Query, you'll need to install it from npm:
npm install react-query --save
Once you've installed React Query, you can use it in any component by wrapping your component with the Query component:
import { Query } from 'react-query';
function myComponent() {
return (
<Query>
{({ data, error, isLoading }) => {
if (isLoading) return <div>Loading...</div>;
if (error) return <div>Error!</div>;
return (
<div>
{data.map(item => (
<div>{item.name}</div>
))}
</div>
);
}}
</Query>
);
}
The Query component takes a query key and options object as props. The query key is used to uniquely identify the query so that React Query can cache and de-duplicate requests. The options object can be used to specify things like the initial data (if any) for the query, the query function to call, and any other options supported by React Query.
In the example above, we're using the default query function, which automatically fetches data from the browser's native fetch API. If we wanted to do something custom like fetch data from a GraphQL API, we could specify our own query function:
import gql from 'graphql-tag';
function graphqlFetch(key, query, variables) {
return fetch('/graphql', {
method: 'POST',
headers: { 'Content-Type': 'application/json' },
body: JSON.stringify({ query, variables }),
}).then(res => res.json());
}
function myComponent() {
return (
<Query queryKey="myQuery" query={graphqlFetch}>
{({ data, error, isLoading }) => {
// ...
}}
</Query>
);
}
Now that we've covered the basics of React Query, let's look at some more advanced features.
Declaring Queries with React Query
If you're using React, you're probably familiar with the concept of a "query". A query is simply a piece of information that you want to retrieve from a data source. In most cases, queries are used to fetch data from a database. However, they can also be used to fetch data from other sources, such as an API.
When it comes to fetching data from a database, there are two ways to go about it. The first is to use a "raw" query, which is a SQL query that you write yourself. The second is to use a "declarative" query, which is a query that is generated by a tool, such as an ORM.
The advantage of using a raw query is that you have complete control over the SQL that is generated. This means that you can optimize the query for performance, and you're not limited by the features of the ORM. However, the downside is that raw queries can be very difficult to write, and they can be error-prone.
The advantage of using a declarative query is that it is much easier to write, and you don't have to worry about mistakes. However, the downside is that you're limited by the features of the ORM, and you might not be able to optimize the query for performance.
Here's an example of how to declare a query with React Query:
```javascript
const { data, error, status } = useQuery(
'users',
() => fetch('/api/users')
);
```
In this example, we're fetching a list of users from an API. The `useQuery` hook will return an object with three properties: `data`, `error`, and `status`.
The `data` property contains the data for the query. In this case, it will be an array of objects, each representing a user.
The `error` property will be set if there was an error fetching the data. In this case, it will be an error object with information about the error.
The `status` property will be set to `'success'` if the data was fetched successfully, or `'error'` if there was an error.
You can use the `data`, `error`, and `status` properties to render the data in your component. For example:
```javascript
if (status === 'success') {
return (
<ul>
{data.map(user => (
<li key={user.id}>{user.name}</li>
))}
</ul>
);
}
if (status === 'error') {
return <div>Error: {error.message}</div>;
}
```
Conclusion
React Query is an incredibly useful library for managing data in React applications. By simplifying data fetching and management, it can help optimize your application's performance, reduce page load times, and provide a better user experience.
One of the key advantages of React Query is its flexible and intuitive API, which can handle different types of data sources, including REST APIs, GraphQL, and local storage. Additionally, React Query's automatic caching and intelligent invalidation features can help reduce unnecessary network requests and ensure that data is always up-to-date.
Overall, if you're looking for a powerful and efficient way to manage data in your React applications, React Query is definitely worth exploring. Whether you're building a simple application or a complex web app, this library can help simplify your queries and make your code more efficient and maintainable.
For more information check out this React Query Builder blog from CopyCat.
0 notes
Text
Something Awesome: Data Thief or Gift Recipient
Okay, we’ve seen more than a few attacks that can be performed when someone clicks a link or navigates to a website.
Cryptojacking
Cross Site Request Forgery
Drive-By Attacks
Zoom 0day
But it’s time to pay homage to the attack that’s hidden in plain site.
tldr; head over to https://fingerprintme.herokuapp.com/ for some fun.
Passive Data Theft
I hesitate to call it theft when in fact we are giving all of this data to every website we visit like a little gift.
Please, accept this bundle of quasi-identifiers as a token of my appreciation.
Many internet users have no idea just how much data is available to websites they are visiting, so it’s worth exploring just what is in our present.

IP Address and Geolocation API
Like any good gift giver, we better write on the tag.
To: <website server> From: <your IP address>
Your IP (Internet Protocol) address is a little 32-bit (now possibly 128-bit) number that uniquely identifies your device on the Internet. This is by design; people need to be able to address you to be able to send you any packets. A static 1:1 mapping of devices to IPs is definitely a massive exaggeration today as as we use technologies to let multiple devices share one IP, dynamically acquire an IP for each session, and our ISPs (Internet Service Providers) may also dynamically assign our IP address.
Nonetheless, IP addresses have (again by design) another function; location addressing. This is because when you’re internet traffic is propagating through the Internet (a global network of routers) it needs to know where it physically needs to go, and fast. Owing to this, the internet has taken on a hierarchical structure, with different ISPs servicing different geographical regions. These ISPs are tiered such that lower tier ISPs service specific subsets of the upper level tier’s region, providing more geographical specificity. It is this property of IP addresses that allows anyone with your IP address to get a rough idea where you are in the world. Moreover, IP addresses from specific subnets like AARNet (for Australian Universities) can be a giveaway for your location.
Try Googling “my ip” or “where am i”. There are many IP to Geolocation API services available. I have made use of https://ipgeolocation.io/, which has a generous free tier 🙏.

User Agent
Every request your browser makes to a server is wrapped up with a nice little UserAgent String bow, that looks a little like this,
User-Agent: Mozilla/<version> (<system-information>) <platform> (<platform-details>) <extensions>
Oh how sweet 😊 it’s our Operating System, our browser and what versions we of each we are running, and if the server is lucky, perhaps a few extra details.
Here are a few examples from MDN:
Mozilla/5.0 (Windows NT 6.1; Win64; x64; rv:47.0) Gecko/20100101 Firefox/47.0
Mozilla/5.0 (Macintosh; Intel Mac OS X x.y; rv:42.0) Gecko/20100101 Firefox/42.0
Mozilla/5.0 (X11; Linux x86_64) AppleWebKit/537.36 (KHTML, like Gecko) Chrome/51.0.2704.103 Safari/537.36
Why might this be a problem? Allow me to direct you towards my earlier post on Drive-By Attacks. Vulnerabilities are often present in specific versions of specific platforms. If an exploit server detects that your particular version of Chrome for Windows (for example) has a known vulnerability, well then prepare to be infected.
Navigator
Okay, I think we’ve been polite enough, it’s time to rip this packaging open! Ooh what is this inside? It’s an invitation to our browser of course!
When we send off a request to a web server complete with our IP and User Agent string, the web server will typically respond by sending us a web page to render. These days a web page can be anything from a single HTML file with a few verses from a dead poet, to a fully fledged JavaScript application. To support this development, browsers are exposing more and more functionality/system information through a special JavaScript interface called Navigator.
From MDN,
The Navigator interface represents the state and the identity of the user agent. It allows scripts to query it and to register themselves to carry on some activities.
...to carry on some activities... I wonder. The list of available properties and methods is pretty comprehensive so I’ll just point out a few interesting ones.
getBattery() (have only seen this on chrome)
connection (some details about your network connection)
hardwareConcurrency (for multithreading)
plugins (another important vector for Drive-Bys)
storage (persisted storage available to websites)
clipboard (requires permissions, goodness plz be careful)
doNotTrack (i wonder who checks this...)
vibrate() (because haptic is the only real feedback)
While I’ve got it in mind, here’s a wonderful browser localStorage vulnerability I stumbled across https://github.com/feross/filldisk.com. There’s a 10MB per site limit, but no browser is enforcing this quota across both a.something.com and b.something.com...
I have no idea why Chrome thinks it’s useful to expose your battery status to every website you visit... Personally, the clipboard API feels the most violating. It requires permissions, but once given you’re never asked again. Control/Command + V right now and see what’s on your clipboard. I doubt there’s many web pages that you’d actually want to be able to read your clipboard every time you visit.

Social Media Side Channel / CSRF
Okay, now we’re getting a little cheeky. It’s actually possible to determine if a browser has an authenticated session with a bunch of social media platforms and services.
It’s a well known vulnerability (have a laughcry at some of the socials responses), which abuses the redirect on login functionality we see on many of these platforms, as well as the Same-Origin Policy SOP being relaxed around HTML tags, as we saw was sometimes exploited by Cross Site Request Forgery attacks.
Consider this lovely image tag.
<img src="https://www.facebook.com/login.php?next=https%3A%2F%2Fwww.facebook.com%2Ffavicon.ico%3F_rdr%3Dp">
As you can see, the image source (at least originally) doesn’t point to an image at all, but rather the Facebook login page. Thanks to SOP, we wouldn’t and shouldn’t be able to send an AJAX request to this website and see the response. But this HTML image tag is going to fire off a GET request for it’s source no problem.
Thanks to redirect on login, if a user rocks up to the login page with the correct session cookies then we won’t have them login again, but rather we redirect them to their newsfeed; or, as it turns out, whatever the URL parameter next points to. What if we point it to an actual image, say the website icon, such that the HTML image tag loads if we are redirected, and fails if not.
Simple but effective. You can try it for yourself here, by opening my codepen in your browser when you’re signed in to Facebook, and when you’re signed out (or just use Incognito).

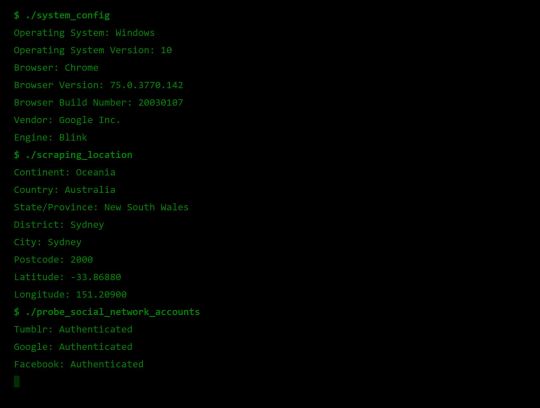
Fingerprint Me v1.0
Okay, time for a demonstration. I took the liberty of writing my own web page that pulls all this data together, and rather than store it for a rainy day (like every other page on the web), I present it to the user on a little web dashboard. It’s like a mirror for your browser. And who doesn’t like to check themselves out in the mirror from time to time 🙃
Random technical content: I had to fetch the geolocation data server-side to protect my API key from the client, then I sneak it back into the static HTML web page I’m serving to the user by setting it on the window variable in some inline script tags.
I bust out some React experience, and have something looking pretty (pretty scary I hope) in some nondescript amount of time (time knows no sink like frontend webdev). I rub my hands together grinning to myself, and send it off to some friends.
“Very scary”. I can see straight through the thin veil of their encouragement and instead read “Yeaaaah okay”. One of them admits that they actually missed the point when they first looked at it. But.. but... nevermind. It’s clearly not having the intended effect. These guys are pretty Internet savvy, but I feel like this should be disconcerting for even the most well seasoned web user...
Like that moment you lock eyes with yourself in the mirror after forgetting to shave a few days in a row.

Fingerprint Me v2.0
An inspired moment follows. I trace it back to the week ?7 activity class on privacy:
It is very hard to make a case for privacy. What is the inherent value of privacy? Why shouldn’t the government have our data, we give it to a million services everyday anyway, and receive a wealth of benefits for it. Go on, have it. I wasn’t using it for anything anyway.
It is very easy to make a case for privacy, if there is any sense that someone malicious is involved. As soon as there is someone who would wish us ill it becomes obvious that there are things that the less they know the better.
<Enter great The Art of War quote here.>
~ Sun Tzu
Therein lies the solution. I need to make the user feel victimised. And what better to do it than a green on black terminal with someone that calls themselves a hacker rooting your machine.
DO CLICK THIS LINK (it’s very safe, I promise) https://fingerprintme.herokuapp.com
Some more random technical content: Programming this quite synchronous behaviour in the very async-centric JavaScript was quite a pain. It was particularly tricky to get around the fact that React renders it’s component hierarchy top down, so I needed the parent components to mount empty in order for them to be correctly populated with child components later. It was also a pain to access and render child components conditionally, especially if you want to have sets of child components in different files, as though they aren’t ultimately nested in the DOM, React will treat them as if they are.
Some User Reviews:
“It feels like I should shut the window”
“This is SO RUDE”
“Battery level. I mean. Literally. How.”
Excellent.
Recommendations
Know what’s in your present, and who you’re gifting it to 🎁
To protect your IP address/location consider using a VPN or ToR
Check out NoScript, a browser plugin that will block JavaScript by default, but allow you to enable it for trusted sites.
Check out and share https://fingerprintme.herokuapp.com 😉
3 notes
·
View notes
Text
React router dom redirect

REACT ROUTER DOM REDIRECT HOW TO
REACT ROUTER DOM REDIRECT INSTALL
REACT ROUTER DOM REDIRECT CODE
So to make it an authenticated route, create a Higher-Order component (HOC) to wrap the authentication logic.// BookCreateForm.test. We will grab the user's name from the URL using route parameters.Ĭurrently the profile page can be accessed directly. Donec dui urna, vehicula et sem eget, facilisis sodales Sollicitudin porttitor, tortor urna tempor ligula, id porttitor mi This component will make use of the component from react-router-dom.Ĭreate a directory called "components" inside the src folder. By default, the query parameters will just pass through but you can specify them if you need to. The path you want to redirect from, including dynamic segments.
Let's start by creating the navigation bar for our app. A sets up a redirect to another route in your application to maintain old URLs.
We will create the Profile page later on in the article. Vestibulum ante ipsum primis in faucibus orci luctusĮt ultrices posuere cubilia curae Duis consequat nulla ac ex consequat, Lorem tortor dapibus turpis, sit amet vestibulum eros mi et odio.Ĭlass aptent taciti sociosqu ad litora torquent per conubia nostra, per Pellentesque dignissim, sapien et congue rutrum, Risus at dapibus aliquet, elit quam scelerisque tortor, nec accumsan eros Lorem ipsum dolor sit amet, consectetur adipiscing elit. Paste the following inside the Home and About components. Creating the Page ComponentsĬreate a pages directory inside the src folder where we will park all the page components.įor this demo, create three pages - Home, About, and Profile. Now that you have the project set up let's start by creating a few page components.
REACT ROUTER DOM REDIRECT CODE
Next, import in the index.js file and clean up all the boilerplate code from the App.js file. yarn add react-router-domįor styling the components, I'm going to use the Bulma CSS framework. is used to build a website for one static page.
uses the hash () in the URL to create a component. Basically, react-router-dom has 2 types of routers used, namely and Both have their advantages depending on what type of Web we are building.
REACT ROUTER DOM REDIRECT INSTALL
I'll be using yarn to install the dependencies, but you can use npm as well. React Router Dom Component Router components. Setup the projectĬreate a new React project by running the following command. Version 6 of React Router is here React Router v6 takes the best features from v3, v5, and its sister project, Reach Router, in our smallest and most powerful package yet. So open up your favorite text editor, and let's get started.
REACT ROUTER DOM REDIRECT HOW TO
In this article, you'll learn how to use React-Router and its components to create a Single Page Application. There is no flashy blank page in between route transitions. React-Router matches the URL and loads up the component for that particular page.Įverything happens so fast, and seamlessly, that the user gets a native app-like experience on the browser. The browser will make a GET request to the server, and the server will return an HTML page as the response.īut, with the new Single Page Application paradigm, all the URL requests are served using the client-side code.Īpplying this in the context of React, each page will be a React component. If you are using routes in your app you are also using react-router-dom. Traditionally routing works like this: let's say you type in /contact in the URL. React router dom redirect Routing is an important task for the proper functioning of a website or application. If you have just started with React, you are probably still wrapping your head around the whole Single Page Application concept.
0 notes
Text
React router dom history push

#React router dom history push how to#
#React router dom history push install#
Note: You can only use () function inside the component page that already listed on your project route, or simply use the withRouter() HOC if the component is not available in the route list. You can navigate to another path by using a. This is also the only way to access history in Class Components, which aren’t compatible with hooks. React Router (react-router-dom) is one of the most popular React libraries with over 46k stars on GitHub and nearly 7 million downloads per week on npmjs. Let’s say we want to move to the dashboard page, all we need to do is: class M圜omponent extends React.Component ) Version 4 of React Router doesn’t include a useHistory hook, so you’ll have to pass down the history object via props. history.push(path, state) Depending on your requirements, you may want to pass update as part of the location state, or the query string.
Consider we have a component, on click of a button we want to get redirected to a '/product' route and pass a product details along with the route, later display the product details on the.
It takes the first argument as a destination path and a second argument as the state. The second parameter in the history.push() method is actually known as the location state. We can pass data in route using browser's History API, which is possible in React through a custom hook useHistory () available in react-router-dom. The history.push() function belongs to react-router-dom and used to move from the current page to another one.
#React router dom history push install#
If you find yourself using both, it’s OK to get rid of React Router since you already have it installed as a dependency within React Router DOM. Use the following command from a terminal window to generate the project directory, then navigate inside the project directory and install required dependencies to add React Router v6 library: npx create-react-app react-router-v6-example cd react-router-v6-example yarn add history react-router-domnext. In other words, you don’t need to use React Router and React Router DOM together.
#React router dom history push how to#
In this article, you will learn how to use in your react project. React Router DOM contains DOM bindings and gives you access to React Router by default.
1 note
·
View note
Text
donkey ears chrome extension + blockchain +react 개발
https://youtu.be/8OCEfOKzpAw
react+ chrome extension 개발 세팅설명 매우 좋은 설명
.
npm install --save react react-dom
npm install --save-dev webpack webpack-cli
npm install --save-dev babel-loader @babel/core @babel/preset-env @babel/preset-react
.
.
아래 과정은 django + django rest framework 세팅 과정
https://vomtom.at/how-to-use-uniswap-v2-as-a-developer/virtual env설치
pip install virtualenv
python3 -m venv venv
venv/Scripts/activate
requirements.txt만들어서 django 와 djangorestframework를 타입
pip install -r requirements.txt를 통해 설치
내용은 아래 그림과 같이 설치할 라이브러리를 파일안에 기입
django-admin startproject donkey_ears
django-admin startapp api
python manage.py migrate
python manage.py makemigrations
python manage.py createsuperuser
.
npm install --save react-router-dom
npm install --save semantic-ui-react.
.
.
npm install --save cryptico
.
npm install --save bip39
bip 39을 이용하여 mnemonic phrase를 얻으려 했으나 chrome extension에���는 사용하려면 자꾸 에러 발생
npm install --save bitcore-mnemonic
npm install --save url
를 대신 사용
사용법 https://www.npmjs.com/package/bitcore-mnemonic
.
npm install --save ethereum-hdwallet
npm install --save crypto
npm install --save assert
npm install --save crypto-browserify
npm install --save stream
.
.
error solution
설치후에 계속 Module not found: Error: Can't resolve 'crypto' 에러 발생 해결은 아래와 같이 했다.
https://stackoverflow.com/a/67076572
*******************************************************************
react + web3, ethers
기본적으로 react를 사용할때 function , class스타일 두가지로 이용가능하다.

react 사용시 import하는 내용
.
클래스 스타일로 이용
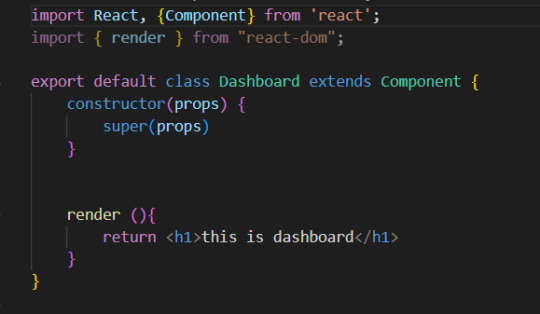
.
함수형태이용

.

Web3.providers.HttpProvder를 통해서 만들어진 provider를 ethers에서도 provider로 사용가능할줄 알았는데 약간 다른 형태의 provider였다.
.
react에서 하위 component에게 데이터 전달하는 방법


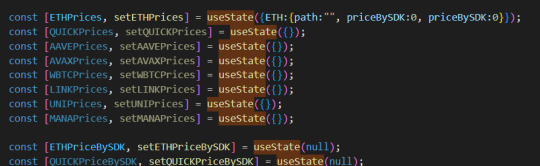
.
react 에서 useState사용하는 방법
const [] 에서 첫번째는 state variable 이름이고 다음은 set 함수이름
useState()안은 초기값
.
componentDidMount과 같은 역활하는 useEffect
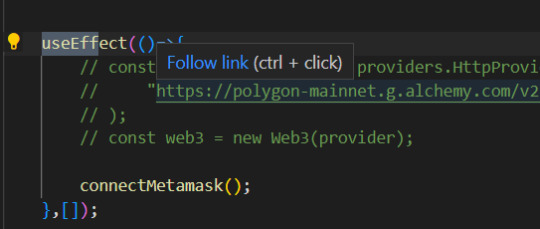
.
window.web3에 값이 할당되면 window.ethereum 에도 비슷한 값이 할당된다.
즉 window.ethereum을 통해서도 window.web3를 통해 하던 데이터를 얻을수 있으나 정확하게 같지는 않다.
window.web3안의 eth값이 있지 않은점이 크게 다른점이다. 그래서 window.ethereum.eth는 불가능하다는 이야기다.
metamask를 이용하는 경우 Web3.providers.HttpProvider()의 작업이 필요하지 않다 metamask안에 자체 provider를 이용한다.
metamask를 이용하는 경우 자동으로 window.ethereum 값이 설정되어있으므로 이를 이용하면 된다.
.
.
.
.
.
***********************************************************************************
***********************************************************************************
redirect 작업을 위해 useNavigate()를 이용하려고 했지만 react router를 사용해야지만 사용할수 있어서 사용하지 않고 window.location.href = '/popup.html?target=CreatePassword'; 와 같은 방법을 사용했다.
https://ncoughlin.com/posts/react-navigation-without-react-router/
.
react router 를 사용하지 못하고 (chrome extension에서는 일반 router기능을 이용할수 없음. 메타메스크의 경우 anchor # 를 이용했다. 아니면 query string을 이용해야 한다.)
.
useState를 통해 주입되는 component 내부에서 useState를 또 사용하는 경우 에러 발생
avubble 프로젝트의 app.js��고해 볼것
.
jsx에서 collection data type을 iterate 하면서 tag만들어내기

.

.
switch를 이용한 경우에 따른 component 삽입
.
chrome storage sync 삭제하기

.
pass parameters executeScript
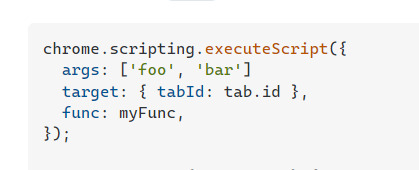
https://stackoverflow.com/a/68640372
.
opensea get sing asset
https://docs.opensea.io/reference/retrieving-a-single-asset-testnets
{ "id": 132352212, "num_sales": 0, "background_color": null, "image_url": "https://i.seadn.io/gae/zNAGqUNWdnYZQDWe9NnswJrQjRAspk8MlwCvRlsdGN6UOPc1Lzc6ZmPliqUMEmyRe1fVyjwm6w-5fr__pfA7hQNC_27RCj5-iLVjNDQ?w=500&auto=format", "image_preview_url": "https://i.seadn.io/gae/zNAGqUNWdnYZQDWe9NnswJrQjRAspk8MlwCvRlsdGN6UOPc1Lzc6ZmPliqUMEmyRe1fVyjwm6w-5fr__pfA7hQNC_27RCj5-iLVjNDQ?w=500&auto=format", "image_thumbnail_url": "https://i.seadn.io/gae/zNAGqUNWdnYZQDWe9NnswJrQjRAspk8MlwCvRlsdGN6UOPc1Lzc6ZmPliqUMEmyRe1fVyjwm6w-5fr__pfA7hQNC_27RCj5-iLVjNDQ?w=500&auto=format", "image_original_url": "https://nftstorage.link/ipfs/bafybeig76mncgmub2f7m7mordkveptk3br4wu6u6j4fhwqznez2ugiskku/0.png", "animation_url": null, "animation_original_url": null, "name": "Test 0", "description": "Test 0", "external_link": null, "asset_contract": { "address": "0xcfaf8eb5546fae192916f73126ea2d5991cb2028", "asset_contract_type": "semi-fungible", "created_date": "2022-09-29T09:41:30.559731", "name": "Example Game ERC 1155", "nft_version": null, "opensea_version": null, "owner": 12540403, "schema_name": "ERC1155", "symbol": "", "total_supply": null, "description": null, "external_link": null, "image_url": null, "default_to_fiat": false, "dev_buyer_fee_basis_points": 0, "dev_seller_fee_basis_points": 0, "only_proxied_transfers": false, "opensea_buyer_fee_basis_points": 0, "opensea_seller_fee_basis_points": 250, "buyer_fee_basis_points": 0, "seller_fee_basis_points": 250, "payout_address": null }, "permalink": "https://testnets.opensea.io/assets/goerli/0xcfaf8eb5546fae192916f73126ea2d5991cb2028/0", "collection": { "payment_tokens": [ { "id": 1507176, "symbol": "ETH", "address": "0x0000000000000000000000000000000000000000", "image_url": "https://openseauserdata.com/files/6f8e2979d428180222796ff4a33ab929.svg", "name": "Ether", "decimals": 18, "eth_price": 1, "usd_price": 1592.29 }, { "id": 1507152, "symbol": "WETH", "address": "0xb4fbf271143f4fbf7b91a5ded31805e42b2208d6", "image_url": "https://openseauserdata.com/files/accae6b6fb3888cbff27a013729c22dc.svg", "name": "Wrapped Ether", "decimals": 18, "eth_price": 1, "usd_price": 1593.2 } ], "primary_asset_contracts": [ { "address": "0xcfaf8eb5546fae192916f73126ea2d5991cb2028", "asset_contract_type": "semi-fungible", "created_date": "2022-09-29T09:41:30.559731", "name": "Example Game ERC 1155", "nft_version": null, "opensea_version": null, "owner": 12540403, "schema_name": "ERC1155", "symbol": "", "total_supply": null, "description": null, "external_link": null, "image_url": null, "default_to_fiat": false, "dev_buyer_fee_basis_points": 0, "dev_seller_fee_basis_points": 0, "only_proxied_transfers": false, "opensea_buyer_fee_basis_points": 0, "opensea_seller_fee_basis_points": 250, "buyer_fee_basis_points": 0, "seller_fee_basis_points": 250, "payout_address": null } ], "traits": {}, "stats": { "one_hour_volume": 0, "one_hour_change": 0, "one_hour_sales": 0, "one_hour_sales_change": 0, "one_hour_average_price": 0, "one_hour_difference": 0, "six_hour_volume": 0, "six_hour_change": 0, "six_hour_sales": 0, "six_hour_sales_change": 0, "six_hour_average_price": 0, "six_hour_difference": 0, "one_day_volume": 0, "one_day_change": 0, "one_day_sales": 0, "one_day_sales_change": 0, "one_day_average_price": 0, "one_day_difference": 0, "seven_day_volume": 0, "seven_day_change": 0, "seven_day_sales": 0, "seven_day_average_price": 0, "seven_day_difference": 0, "thirty_day_volume": 0, "thirty_day_change": 0, "thirty_day_sales": 0, "thirty_day_average_price": 0, "thirty_day_difference": 0, "total_volume": 0, "total_sales": 0, "total_supply": 1, "count": 1, "num_owners": 1, "average_price": 0, "num_reports": 0, "market_cap": 0, "floor_price": 0 }, "banner_image_url": null, "chat_url": null, "created_date": "2022-09-29T09:41:30.933452+00:00", "default_to_fiat": false, "description": null, "dev_buyer_fee_basis_points": "0", "dev_seller_fee_basis_points": "0", "discord_url": null, "display_data": { "card_display_style": "contain", "images": [] }, "external_url": null, "featured": false, "featured_image_url": null, "hidden": false, "safelist_request_status": "not_requested", "image_url": null, "is_subject_to_whitelist": false, "large_image_url": null, "medium_username": null, "name": "Example Game ERC 1155", "only_proxied_transfers": false, "opensea_buyer_fee_basis_points": "0", "opensea_seller_fee_basis_points": "250", "payout_address": null, "require_email": false, "short_description": null, "slug": "example-game-erc-1155", "telegram_url": null, "twitter_username": null, "instagram_username": null, "wiki_url": null, "is_nsfw": false, "fees": { "seller_fees": {}, "opensea_fees": { "0x0000a26b00c1f0df003000390027140000faa719": 250 } }, "is_rarity_enabled": false }, "decimals": null, "token_metadata": "https://nftstorage.link/ipfs/bafybeihfcvvlchgu6wogre4ae3jqwigyey3kgb2ur5o3jajv3zsmyve32q/0.json", "is_nsfw": false, "owner": { "user": null, "profile_img_url": "https://storage.googleapis.com/opensea-static/opensea-profile/1.png", "address": "0x0000000000000000000000000000000000000000", "config": "" }, "seaport_sell_orders": null, "creator": { "user": { "username": null }, "profile_img_url": "https://storage.googleapis.com/opensea-static/opensea-profile/2.png", "address": "0x72cebbf26f93cc5913fd87076c59428b794d6786", "config": "" }, "traits": [ { "trait_type": "Base", "value": "Starfish", "display_type": null, "max_value": null, "trait_count": 0, "order": null }, { "trait_type": "Eye", "value": "Big", "display_type": null, "max_value": null, "trait_count": 0, "order": null } ], "last_sale": null, "top_bid": null, "listing_date": null, "is_presale": false, "supports_wyvern": true, "rarity_data": null, "transfer_fee": null, "transfer_fee_payment_token": null, "related_assets": [], "orders": null, "auctions": [], "top_ownerships": [ { "owner": { "user": { "username": null }, "profile_img_url": "https://storage.googleapis.com/opensea-static/opensea-profile/2.png", "address": "0x72cebbf26f93cc5913fd87076c59428b794d6786", "config": "" }, "quantity": "3", "created_date": "2022-09-29T09:44:15.755541+00:00" } ], "ownership": null, "highest_buyer_commitment": null, "token_id": "0" }
.
solidity development
title generator
https://patorjk.com/
.
spdx license
// SPDX-License-Identifier: MIT
.
mumbai test contract
0x383A22a13D2693ecE63186A594671635a4C163fB
0 notes
Link
The Jamstack way of thinking and building websites is becoming more and more popular. Have you already tried Gatsby, Nuxt, or Gridsome (to cite only a few)? Chances are that your first contact was a “Wow!” moment — so many things are automatically set up and ready to use. There are some challenges, though, one of which is search functionality. If you’re working on any sort of content-driven site, you’ll likely run into search and how to handle it. Can it be done without any external server-side technology? Search is not one of those things that come out of the box with Jamstack. Some extra decisions and implementation are required. Fortunately, we have a bunch of options that might be more or less adapted to a project. We could use Algolia’s powerful search-as-service API. It comes with a free plan that is restricted to non-commercial projects with a limited capacity. If we were to use WordPress with WPGraphQL as a data source, we could take advantage of WordPress native search functionality and Apollo Client. Raymond Camden recently explored a few Jamstack search options, including pointing a search form directly at Google. In this article, we will build a search index and add search functionality to a Gatsby website with Lunr, a lightweight JavaScript library providing an extensible and customizable search without the need for external, server-side services. We used it recently to add “Search by Tartan Name” to our Gatsby project tartanify.com. We absolutely wanted persistent search as-you-type functionality, which brought some extra challenges. But that’s what makes it interesting, right? I’ll discuss some of the difficulties we faced and how we dealt with them in the second half of this article.

Getting started
For the sake of simplicity, let’s use the official Gatsby blog starter. Using a generic starter lets us abstract many aspects of building a static website. If you’re following along, make sure to install and run it:
gatsby new gatsby-starter-blog https://github.com/gatsbyjs/gatsby-starter-blog cd gatsby-starter-blog gatsby develop
It’s a tiny blog with three posts we can view by opening up http://localhost:8000/___graphql in the browser.

Inverting index with Lunr.js 🙃
Lunr uses a record-level inverted index as its data structure. The inverted index stores the mapping for each word found within a website to its location (basically a set of page paths). It’s on us to decide which fields (e.g. title, content, description, etc.) provide the keys (words) for the index. For our blog example, I decided to include all titles and the content of each article. Dealing with titles is straightforward since they are composed uniquely of words. Indexing content is a little more complex. My first try was to use the rawMarkdownBody field. Unfortunately, rawMarkdownBody introduces some unwanted keys resulting from the markdown syntax.
I obtained a “clean” index using the html field in conjunction with the striptags package (which, as the name suggests, strips out the HTML tags). Before we get into the details, let’s look into the Lunr documentation. Here’s how we create and populate the Lunr index. We will use this snippet in a moment, specifically in our gatsby-node.js file.
const index = lunr(function () { this.ref('slug') this.field('title') this.field('content') for (const doc of documents) { this.add(doc) } })
documents is an array of objects, each with a slug, title and content property:
{ slug: '/post-slug/', title: 'Post Title', content: 'Post content with all HTML tags stripped out.' }
We will define a unique document key (the slug) and two fields (the title and content, or the key providers). Finally, we will add all of the documents, one by one. Let’s get started.
Creating an index in gatsby-node.js
Let’s start by installing the libraries that we are going to use.
yarn add lunr graphql-type-json striptags
Next, we need to edit the gatsby-node.js file. The code from this file runs once in the process of building a site, and our aim is to add index creation to the tasks that Gatsby executes on build. CreateResolvers is one of the Gatsby APIs controlling the GraphQL data layer. In this particular case, we will use it to create a new root field; Let’s call it LunrIndex. Gatsby’s internal data store and query capabilities are exposed to GraphQL field resolvers on context.nodeModel. With getAllNodes, we can get all nodes of a specified type:
/* gatsby-node.js */ const { GraphQLJSONObject } = require(`graphql-type-json`) const striptags = require(`striptags`) const lunr = require(`lunr`) exports.createResolvers = ({ cache, createResolvers }) => { createResolvers({ Query: { LunrIndex: { type: GraphQLJSONObject, resolve: (source, args, context, info) => { const blogNodes = context.nodeModel.getAllNodes({ type: `MarkdownRemark`, }) const type = info.schema.getType(`MarkdownRemark`) return createIndex(blogNodes, type, cache) }, }, }, }) }
Now let’s focus on the createIndex function. That’s where we will use the Lunr snippet we mentioned in the last section.
/* gatsby-node.js */ const createIndex = async (blogNodes, type, cache) => { const documents = [] // Iterate over all posts for (const node of blogNodes) { const html = await type.getFields().html.resolve(node) // Once html is resolved, add a slug-title-content object to the documents array documents.push({ slug: node.fields.slug, title: node.frontmatter.title, content: striptags(html), }) } const index = lunr(function() { this.ref(`slug`) this.field(`title`) this.field(`content`) for (const doc of documents) { this.add(doc) } }) return index.toJSON() }
Have you noticed that instead of accessing the HTML element directly with const html = node.html, we’re using an await expression? That’s because node.html isn’t available yet. The gatsby-transformer-remark plugin (used by our starter to parse Markdown files) does not generate HTML from markdown immediately when creating the MarkdownRemark nodes. Instead, html is generated lazily when the html field resolver is called in a query. The same actually applies to the excerpt that we will need in just a bit. Let’s look ahead and think about how we are going to display search results. Users expect to obtain a link to the matching post, with its title as the anchor text. Very likely, they wouldn’t mind a short excerpt as well. Lunr’s search returns an array of objects representing matching documents by the ref property (which is the unique document key slug in our example). This array does not contain the document title nor the content. Therefore, we need to store somewhere the post title and excerpt corresponding to each slug. We can do that within our LunrIndex as below:
/* gatsby-node.js */ const createIndex = async (blogNodes, type, cache) => { const documents = [] const store = {} for (const node of blogNodes) { const {slug} = node.fields const title = node.frontmatter.title const [html, excerpt] = await Promise.all([ type.getFields().html.resolve(node), type.getFields().excerpt.resolve(node, { pruneLength: 40 }), ]) documents.push({ // unchanged }) store[slug] = { title, excerpt, } } const index = lunr(function() { // unchanged }) return { index: index.toJSON(), store } }
Our search index changes only if one of the posts is modified or a new post is added. We don’t need to rebuild the index each time we run gatsby develop. To avoid unnecessary builds, let’s take advantage of the cache API:
/* gatsby-node.js */ const createIndex = async (blogNodes, type, cache) => { const cacheKey = `IndexLunr` const cached = await cache.get(cacheKey) if (cached) { return cached } // unchanged const json = { index: index.toJSON(), store } await cache.set(cacheKey, json) return json }
Enhancing pages with the search form component
We can now move on to the front end of our implementation. Let’s start by building a search form component.
touch src/components/search-form.js
I opt for a straightforward solution: an input of type="search", coupled with a label and accompanied by a submit button, all wrapped within a form tag with the search landmark role. We will add two event handlers, handleSubmit on form submit and handleChange on changes to the search input.
/* src/components/search-form.js */ import React, { useState, useRef } from "react" import { navigate } from "@reach/router" const SearchForm = ({ initialQuery = "" }) => { // Create a piece of state, and initialize it to initialQuery // query will hold the current value of the state, // and setQuery will let us change it const [query, setQuery] = useState(initialQuery) // We need to get reference to the search input element const inputEl = useRef(null) // On input change use the current value of the input field (e.target.value) // to update the state's query value const handleChange = e => { setQuery(e.target.value) } // When the form is submitted navigate to /search // with a query q paramenter equal to the value within the input search const handleSubmit = e => { e.preventDefault() // `inputEl.current` points to the mounted search input element const q = inputEl.current.value navigate(`/search?q=${q}`) } return ( <form role="search" onSubmit={handleSubmit}> <label htmlFor="search-input" style=> Search for: </label> <input ref={inputEl} id="search-input" type="search" value={query} placeholder="e.g. duck" onChange={handleChange} /> <button type="submit">Go</button> </form> ) } export default SearchForm
Have you noticed that we’re importing navigate from the @reach/router package? That is necessary since neither Gatsby’s <Link/> nor navigate provide in-route navigation with a query parameter. Instead, we can import @reach/router — there’s no need to install it since Gatsby already includes it — and use its navigate function. Now that we’ve built our component, let’s add it to our home page (as below) and 404 page.
/* src/pages/index.js */ // unchanged import SearchForm from "../components/search-form" const BlogIndex = ({ data, location }) => { // unchanged return ( <Layout location={location} title={siteTitle}> <SEO title="All posts" /> <Bio /> <SearchForm /> // unchanged
Search results page
Our SearchForm component navigates to the /search route when the form is submitted, but for the moment, there is nothing behing this URL. That means we need to add a new page:
touch src/pages/search.js
I proceeded by copying and adapting the content of the the index.js page. One of the essential modifications concerns the page query (see the very bottom of the file). We will replace allMarkdownRemark with the LunrIndex field.
/* src/pages/search.js */ import React from "react" import { Link, graphql } from "gatsby" import { Index } from "lunr" import Layout from "../components/layout" import SEO from "../components/seo" import SearchForm from "../components/search-form"
// We can access the results of the page GraphQL query via the data props const SearchPage = ({ data, location }) => { const siteTitle = data.site.siteMetadata.title // We can read what follows the ?q= here // URLSearchParams provides a native way to get URL params // location.search.slice(1) gets rid of the "?" const params = new URLSearchParams(location.search.slice(1)) const q = params.get("q") || ""
// LunrIndex is available via page query const { store } = data.LunrIndex // Lunr in action here const index = Index.load(data.LunrIndex.index) let results = [] try { // Search is a lunr method results = index.search(q).map(({ ref }) => { // Map search results to an array of {slug, title, excerpt} objects return { slug: ref, ...store[ref], } }) } catch (error) { console.log(error) } return ( // We will take care of this part in a moment ) } export default SearchPage export const pageQuery = graphql` query { site { siteMetadata { title } } LunrIndex } `
Now that we know how to retrieve the query value and the matching posts, let’s display the content of the page. Notice that on the search page we pass the query value to the <SearchForm /> component via the initialQuery props. When the user arrives to the search results page, their search query should remain in the input field.
return ( <Layout location={location} title={siteTitle}> <SEO title="Search results" /> {q ? <h1>Search results</h1> : <h1>What are you looking for?</h1>} <SearchForm initialQuery={q} /> {results.length ? ( results.map(result => { return ( <article key={result.slug}> <h2> <Link to={result.slug}> {result.title || result.slug} </Link> </h2> <p>{result.excerpt}</p> </article> ) }) ) : ( <p>Nothing found.</p> )} </Layout> )
You can find the complete code in this gatsby-starter-blog fork and the live demo deployed on Netlify.
Instant search widget
Finding the most “logical” and user-friendly way of implementing search may be a challenge in and of itself. Let’s now switch to the real-life example of tartanify.com — a Gatsby-powered website gathering 5,000+ tartan patterns. Since tartans are often associated with clans or organizations, the possibility to search a tartan by name seems to make sense. We built tartanify.com as a side project where we feel absolutely free to experiment with things. We didn’t want a classic search results page but an instant search “widget.” Often, a given search keyword corresponds with a number of results — for example, “Ramsay” comes in six variations. We imagined the search widget would be persistent, meaning it should stay in place when a user navigates from one matching tartan to another.
Let me show you how we made it work with Lunr. The first step of building the index is very similar to the gatsby-starter-blog example, only simpler:
/* gatsby-node.js */ exports.createResolvers = ({ cache, createResolvers }) => { createResolvers({ Query: { LunrIndex: { type: GraphQLJSONObject, resolve(source, args, context) { const siteNodes = context.nodeModel.getAllNodes({ type: `TartansCsv`, }) return createIndex(siteNodes, cache) }, }, }, }) } const createIndex = async (nodes, cache) => { const cacheKey = `LunrIndex` const cached = await cache.get(cacheKey) if (cached) { return cached } const store = {} const index = lunr(function() { this.ref(`slug`) this.field(`title`) for (node of nodes) { const { slug } = node.fields const doc = { slug, title: node.fields.Unique_Name, } store[slug] = { title: doc.title, } this.add(doc) } }) const json = { index: index.toJSON(), store } cache.set(cacheKey, json) return json }
We opted for instant search, which means that search is triggered by any change in the search input instead of a form submission.
/* src/components/searchwidget.js */ import React, { useState } from "react" import lunr, { Index } from "lunr" import { graphql, useStaticQuery } from "gatsby" import SearchResults from "./searchresults"
const SearchWidget = () => { const [value, setValue] = useState("") // results is now a state variable const [results, setResults] = useState([])
// Since it's not a page component, useStaticQuery for quering data // https://www.gatsbyjs.org/docs/use-static-query/ const { LunrIndex } = useStaticQuery(graphql` query { LunrIndex } `) const index = Index.load(LunrIndex.index) const { store } = LunrIndex const handleChange = e => { const query = e.target.value setValue(query) try { const search = index.search(query).map(({ ref }) => { return { slug: ref, ...store[ref], } }) setResults(search) } catch (error) { console.log(error) } } return ( <div className="search-wrapper"> // You can use a form tag as well, as long as we prevent the default submit behavior <div role="search"> <label htmlFor="search-input" className="visually-hidden"> Search Tartans by Name </label> <input id="search-input" type="search" value={value} onChange={handleChange} placeholder="Search Tartans by Name" /> </div> <SearchResults results={results} /> </div> ) } export default SearchWidget
The SearchResults are structured like this:
/* src/components/searchresults.js */ import React from "react" import { Link } from "gatsby" const SearchResults = ({ results }) => ( <div> {results.length ? ( <> <h2>{results.length} tartan(s) matched your query</h2> <ul> {results.map(result => ( <li key={result.slug}> <Link to={`/tartan/${result.slug}`}>{result.title}</Link> </li> ))} </ul> </> ) : ( <p>Sorry, no matches found.</p> )} </div> ) export default SearchResults
Making it persistent
Where should we use this component? We could add it to the Layout component. The problem is that our search form will get unmounted on page changes that way. If a user wants to browser all tartans associated with the “Ramsay” clan, they will have to retype their query several times. That’s not ideal. Thomas Weibenfalk has written a great article on keeping state between pages with local state in Gatsby.js. We will use the same technique, where the wrapPageElement browser API sets persistent UI elements around pages. Let’s add the following code to the gatsby-browser.js. You might need to add this file to the root of your project.
/* gatsby-browser.js */ import React from "react" import SearchWrapper from "./src/components/searchwrapper" export const wrapPageElement = ({ element, props }) => ( <SearchWrapper {...props}>{element}</SearchWrapper> )
Now let’s add a new component file:
touch src/components/searchwrapper.js
Instead of adding SearchWidget component to the Layout, we will add it to the SearchWrapper and the magic happens. ��
/* src/components/searchwrapper.js */ import React from "react" import SearchWidget from "./searchwidget"
const SearchWrapper = ({ children }) => ( <> {children} <SearchWidget /> </> ) export default SearchWrapper
Creating a custom search query
At this point, I started to try different keywords but very quickly realized that Lunr’s default search query might not be the best solution when used for instant search. Why? Imagine that we are looking for tartans associated with the name MacCallum. While typing “MacCallum” letter-by-letter, this is the evolution of the results:
m – 2 matches (Lyon, Jeffrey M, Lyon, Jeffrey M (Hunting))
ma – no matches
mac – 1 match (Brighton Mac Dermotte)
macc – no matches
macca – no matches
maccal – 1 match (MacCall)
maccall – 1 match (MacCall)
maccallu – no matches
maccallum – 3 matches (MacCallum, MacCallum #2, MacCallum of Berwick)
Users will probably type the full name and hit the button if we make a button available. But with instant search, a user is likely to abandon early because they may expect that the results can only narrow down letters are added to the keyword query. That’s not the only problem. Here’s what we get with “Callum”:
c – 3 unrelated matches
ca – no matches
cal – no matches
call – no matches
callu – no matches
callum – one match
You can see the trouble if someone gives up halfway into typing the full query. Fortunately, Lunr supports more complex queries, including fuzzy matches, wildcards and boolean logic (e.g. AND, OR, NOT) for multiple terms. All of these are available either via a special query syntax, for example:
index.search("+*callum mac*")
We could also reach for the index query method to handle it programatically. The first solution is not satisfying since it requires more effort from the user. I used the index.query method instead:
/* src/components/searchwidget.js */ const search = index .query(function(q) { // full term matching q.term(el) // OR (default) // trailing or leading wildcard q.term(el, { wildcard: lunr.Query.wildcard.LEADING | lunr.Query.wildcard.TRAILING, }) }) .map(({ ref }) => { return { slug: ref, ...store[ref], } })
Why use full term matching with wildcard matching? That’s necessary for all keywords that “benefit” from the stemming process. For example, the stem of “different” is “differ.” As a consequence, queries with wildcards — such as differe*, differen* or different* — all result in no matches, while the full term queries differe, differen and different return matches. Fuzzy matches can be used as well. In our case, they are allowed uniquely for terms of five or more characters:
q.term(el, { editDistance: el.length > 5 ? 1 : 0 }) q.term(el, { wildcard: lunr.Query.wildcard.LEADING | lunr.Query.wildcard.TRAILING, })
The handleChange function also “cleans up” user inputs and ignores single-character terms:
/* src/components/searchwidget.js */ const handleChange = e => { const query = e.target.value || "" setValue(query) if (!query.length) { setResults([]) } const keywords = query .trim() // remove trailing and leading spaces .replace(/\*/g, "") // remove user's wildcards .toLowerCase() .split(/\s+/) // split by whitespaces // do nothing if the last typed keyword is shorter than 2 if (keywords[keywords.length - 1].length < 2) { return } try { const search = index .query(function(q) { keywords // filter out keywords shorter than 2 .filter(el => el.length > 1) // loop over keywords .forEach(el => { q.term(el, { editDistance: el.length > 5 ? 1 : 0 }) q.term(el, { wildcard: lunr.Query.wildcard.LEADING | lunr.Query.wildcard.TRAILING, }) }) }) .map(({ ref }) => { return { slug: ref, ...store[ref], } }) setResults(search) } catch (error) { console.log(error) } }
Let’s check it in action:
m – pending
ma – 861 matches
mac – 600 matches
macc – 35 matches
macca – 12 matches
maccal – 9 matches
maccall – 9 matches
maccallu – 3 matches
maccallum – 3 matches
Searching for “Callum” works as well, resulting in four matches: Callum, MacCallum, MacCallum #2, and MacCallum of Berwick. There is one more problem, though: multi-terms queries. Say, you’re looking for “Loch Ness.” There are two tartans associated with that term, but with the default OR logic, you get a grand total of 96 results. (There are plenty of other lakes in Scotland.) I wound up deciding that an AND search would work better for this project. Unfortunately, Lunr does not support nested queries, and what we actually need is (keyword1 OR *keyword*) AND (keyword2 OR *keyword2*). To overcome this, I ended up moving the terms loop outside the query method and intersecting the results per term. (By intersecting, I mean finding all slugs that appear in all of the per-single-keyword results.)
/* src/components/searchwidget.js */ try { // andSearch stores the intersection of all per-term results let andSearch = [] keywords .filter(el => el.length > 1) // loop over keywords .forEach((el, i) => { // per-single-keyword results const keywordSearch = index .query(function(q) { q.term(el, { editDistance: el.length > 5 ? 1 : 0 }) q.term(el, { wildcard: lunr.Query.wildcard.LEADING | lunr.Query.wildcard.TRAILING, }) }) .map(({ ref }) => { return { slug: ref, ...store[ref], } }) // intersect current keywordSearch with andSearch andSearch = i > 0 ? andSearch.filter(x => keywordSearch.some(el => el.slug === x.slug)) : keywordSearch }) setResults(andSearch) } catch (error) { console.log(error) }
The source code for tartanify.com is published on GitHub. You can see the complete implementation of the Lunr search there.
Final thoughts
Search is often a non-negotiable feature for finding content on a site. How important the search functionality actually is may vary from one project to another. Nevertheless, there is no reason to abandon it under the pretext that it does not tally with the static character of Jamstack websites. There are many possibilities. We’ve just discussed one of them. And, paradoxically in this specific example, the result was a better all-around user experience, thanks to the fact that implementing search was not an obvious task but instead required a lot of deliberation. We may not have been able to say the same with an over-the-counter solution.
0 notes
Text
How to Add Lunr Search to your Gatsby Website
The Jamstack way of thinking and building websites is becoming more and more popular.
Have you already tried Gatsby, Nuxt, or Gridsome (to cite only a few)? Chances are that your first contact was a “Wow!” moment — so many things are automatically set up and ready to use.
There are some challenges, though, one of which is search functionality. If you’re working on any sort of content-driven site, you’ll likely run into search and how to handle it. Can it be done without any external server-side technology?
Search is not one of those things that come out of the box with Jamstack. Some extra decisions and implementation are required.
Fortunately, we have a bunch of options that might be more or less adapted to a project. We could use Algolia’s powerful search-as-service API. It comes with a free plan that is restricted to non-commercial projects with a limited capacity. If we were to use WordPress with WPGraphQL as a data source, we could take advantage of WordPress native search functionality and Apollo Client. Raymond Camden recently explored a few Jamstack search options, including pointing a search form directly at Google.
In this article, we will build a search index and add search functionality to a Gatsby website with Lunr, a lightweight JavaScript library providing an extensible and customizable search without the need for external, server-side services. We used it recently to add “Search by Tartan Name” to our Gatsby project tartanify.com. We absolutely wanted persistent search as-you-type functionality, which brought some extra challenges. But that’s what makes it interesting, right? I’ll discuss some of the difficulties we faced and how we dealt with them in the second half of this article.

Getting started
For the sake of simplicity, let’s use the official Gatsby blog starter. Using a generic starter lets us abstract many aspects of building a static website. If you’re following along, make sure to install and run it:
gatsby new gatsby-starter-blog https://github.com/gatsbyjs/gatsby-starter-blog cd gatsby-starter-blog gatsby develop
It’s a tiny blog with three posts we can view by opening up http://localhost:8000/___graphql in the browser.
Inverting index with Lunr.js

Lunr uses a record-level inverted index as its data structure. The inverted index stores the mapping for each word found within a website to its location (basically a set of page paths). It’s on us to decide which fields (e.g. title, content, description, etc.) provide the keys (words) for the index.
For our blog example, I decided to include all titles and the content of each article. Dealing with titles is straightforward since they are composed uniquely of words. Indexing content is a little more complex. My first try was to use the rawMarkdownBody field. Unfortunately, rawMarkdownBody introduces some unwanted keys resulting from the markdown syntax.

I obtained a “clean” index using the html field in conjunction with the striptags package (which, as the name suggests, strips out the HTML tags). Before we get into the details, let’s look into the Lunr documentation.
Here’s how we create and populate the Lunr index. We will use this snippet in a moment, specifically in our gatsby-node.js file.
const index = lunr(function () { this.ref('slug') this.field('title') this.field('content') for (const doc of documents) { this.add(doc) } })
documents is an array of objects, each with a slug, title and content property:
{ slug: '/post-slug/', title: 'Post Title', content: 'Post content with all HTML tags stripped out.' }
We will define a unique document key (the slug) and two fields (the title and content, or the key providers). Finally, we will add all of the documents, one by one.
Let’s get started.
Creating an index in gatsby-node.js
Let’s start by installing the libraries that we are going to use.
yarn add lunr graphql-type-json striptags
Next, we need to edit the gatsby-node.js file. The code from this file runs once in the process of building a site, and our aim is to add index creation to the tasks that Gatsby executes on build.
CreateResolvers is one of the Gatsby APIs controlling the GraphQL data layer. In this particular case, we will use it to create a new root field; Let’s call it LunrIndex.
Gatsby’s internal data store and query capabilities are exposed to GraphQL field resolvers on context.nodeModel. With getAllNodes, we can get all nodes of a specified type:
/* gatsby-node.js */ const { GraphQLJSONObject } = require(`graphql-type-json`) const striptags = require(`striptags`) const lunr = require(`lunr`) exports.createResolvers = ({ cache, createResolvers }) => { createResolvers({ Query: { LunrIndex: { type: GraphQLJSONObject, resolve: (source, args, context, info) => { const blogNodes = context.nodeModel.getAllNodes({ type: `MarkdownRemark`, }) const type = info.schema.getType(`MarkdownRemark`) return createIndex(blogNodes, type, cache) }, }, }, }) }
Now let’s focus on the createIndex function. That’s where we will use the Lunr snippet we mentioned in the last section.
/* gatsby-node.js */ const createIndex = async (blogNodes, type, cache) => { const documents = [] // Iterate over all posts for (const node of blogNodes) { const html = await type.getFields().html.resolve(node) // Once html is resolved, add a slug-title-content object to the documents array documents.push({ slug: node.fields.slug, title: node.frontmatter.title, content: striptags(html), }) } const index = lunr(function() { this.ref(`slug`) this.field(`title`) this.field(`content`) for (const doc of documents) { this.add(doc) } }) return index.toJSON() }
Have you noticed that instead of accessing the HTML element directly with const html = node.html, we’re using an await expression? That’s because node.html isn’t available yet. The gatsby-transformer-remark plugin (used by our starter to parse Markdown files) does not generate HTML from markdown immediately when creating the MarkdownRemark nodes. Instead, html is generated lazily when the html field resolver is called in a query. The same actually applies to the excerpt that we will need in just a bit.
Let’s look ahead and think about how we are going to display search results. Users expect to obtain a link to the matching post, with its title as the anchor text. Very likely, they wouldn’t mind a short excerpt as well.
Lunr’s search returns an array of objects representing matching documents by the ref property (which is the unique document key slug in our example). This array does not contain the document title nor the content. Therefore, we need to store somewhere the post title and excerpt corresponding to each slug. We can do that within our LunrIndex as below:
/* gatsby-node.js */ const createIndex = async (blogNodes, type, cache) => { const documents = [] const store = {} for (const node of blogNodes) { const {slug} = node.fields const title = node.frontmatter.title const [html, excerpt] = await Promise.all([ type.getFields().html.resolve(node), type.getFields().excerpt.resolve(node, { pruneLength: 40 }), ]) documents.push({ // unchanged }) store[slug] = { title, excerpt, } } const index = lunr(function() { // unchanged }) return { index: index.toJSON(), store } }
Our search index changes only if one of the posts is modified or a new post is added. We don’t need to rebuild the index each time we run gatsby develop. To avoid unnecessary builds, let’s take advantage of the cache API:
/* gatsby-node.js */ const createIndex = async (blogNodes, type, cache) => { const cacheKey = `IndexLunr` const cached = await cache.get(cacheKey) if (cached) { return cached } // unchanged const json = { index: index.toJSON(), store } await cache.set(cacheKey, json) return json }
Enhancing pages with the search form component
We can now move on to the front end of our implementation. Let’s start by building a search form component.
touch src/components/search-form.js
I opt for a straightforward solution: an input of type="search", coupled with a label and accompanied by a submit button, all wrapped within a form tag with the search landmark role.
We will add two event handlers, handleSubmit on form submit and handleChange on changes to the search input.
/* src/components/search-form.js */ import React, { useState, useRef } from "react" import { navigate } from "@reach/router" const SearchForm = ({ initialQuery = "" }) => { // Create a piece of state, and initialize it to initialQuery // query will hold the current value of the state, // and setQuery will let us change it const [query, setQuery] = useState(initialQuery) // We need to get reference to the search input element const inputEl = useRef(null) // On input change use the current value of the input field (e.target.value) // to update the state's query value const handleChange = e => { setQuery(e.target.value) } // When the form is submitted navigate to /search // with a query q paramenter equal to the value within the input search const handleSubmit = e => { e.preventDefault() // `inputEl.current` points to the mounted search input element const q = inputEl.current.value navigate(`/search?q=${q}`) } return ( <form role="search" onSubmit={handleSubmit}> <label htmlFor="search-input" style=> Search for: </label> <input ref={inputEl} id="search-input" type="search" value={query} placeholder="e.g. duck" onChange={handleChange} /> <button type="submit">Go</button> </form> ) } export default SearchForm
Have you noticed that we’re importing navigate from the @reach/router package? That is necessary since neither Gatsby’s <Link/> nor navigate provide in-route navigation with a query parameter. Instead, we can import @reach/router — there’s no need to install it since Gatsby already includes it — and use its navigate function.
Now that we’ve built our component, let’s add it to our home page (as below) and 404 page.
/* src/pages/index.js */ // unchanged import SearchForm from "../components/search-form" const BlogIndex = ({ data, location }) => { // unchanged return ( <Layout location={location} title={siteTitle}> <SEO title="All posts" /> <Bio /> <SearchForm /> // unchanged
Search results page
Our SearchForm component navigates to the /search route when the form is submitted, but for the moment, there is nothing behing this URL. That means we need to add a new page:
touch src/pages/search.js
I proceeded by copying and adapting the content of the the index.js page. One of the essential modifications concerns the page query (see the very bottom of the file). We will replace allMarkdownRemark with the LunrIndex field.
/* src/pages/search.js */ import React from "react" import { Link, graphql } from "gatsby" import { Index } from "lunr" import Layout from "../components/layout" import SEO from "../components/seo" import SearchForm from "../components/search-form"
// We can access the results of the page GraphQL query via the data props const SearchPage = ({ data, location }) => { const siteTitle = data.site.siteMetadata.title // We can read what follows the ?q= here // URLSearchParams provides a native way to get URL params // location.search.slice(1) gets rid of the "?" const params = new URLSearchParams(location.search.slice(1)) const q = params.get("q") || ""
// LunrIndex is available via page query const { store } = data.LunrIndex // Lunr in action here const index = Index.load(data.LunrIndex.index) let results = [] try { // Search is a lunr method results = index.search(q).map(({ ref }) => { // Map search results to an array of {slug, title, excerpt} objects return { slug: ref, ...store[ref], } }) } catch (error) { console.log(error) } return ( // We will take care of this part in a moment ) } export default SearchPage export const pageQuery = graphql` query { site { siteMetadata { title } } LunrIndex } `
Now that we know how to retrieve the query value and the matching posts, let’s display the content of the page. Notice that on the search page we pass the query value to the <SearchForm /> component via the initialQuery props. When the user arrives to the search results page, their search query should remain in the input field.
return ( <Layout location={location} title={siteTitle}> <SEO title="Search results" /> {q ? <h1>Search results</h1> : <h1>What are you looking for?</h1>} <SearchForm initialQuery={q} /> {results.length ? ( results.map(result => { return ( <article key={result.slug}> <h2> <Link to={result.slug}> {result.title || result.slug} </Link> </h2> <p>{result.excerpt}</p> </article> ) }) ) : ( <p>Nothing found.</p> )} </Layout> )
You can find the complete code in this gatsby-starter-blog fork and the live demo deployed on Netlify.
Instant search widget
Finding the most “logical” and user-friendly way of implementing search may be a challenge in and of itself. Let’s now switch to the real-life example of tartanify.com — a Gatsby-powered website gathering 5,000+ tartan patterns. Since tartans are often associated with clans or organizations, the possibility to search a tartan by name seems to make sense.
We built tartanify.com as a side project where we feel absolutely free to experiment with things. We didn’t want a classic search results page but an instant search “widget.” Often, a given search keyword corresponds with a number of results — for example, “Ramsay” comes in six variations. We imagined the search widget would be persistent, meaning it should stay in place when a user navigates from one matching tartan to another.
Let me show you how we made it work with Lunr. The first step of building the index is very similar to the gatsby-starter-blog example, only simpler:
/* gatsby-node.js */ exports.createResolvers = ({ cache, createResolvers }) => { createResolvers({ Query: { LunrIndex: { type: GraphQLJSONObject, resolve(source, args, context) { const siteNodes = context.nodeModel.getAllNodes({ type: `TartansCsv`, }) return createIndex(siteNodes, cache) }, }, }, }) } const createIndex = async (nodes, cache) => { const cacheKey = `LunrIndex` const cached = await cache.get(cacheKey) if (cached) { return cached } const store = {} const index = lunr(function() { this.ref(`slug`) this.field(`title`) for (node of nodes) { const { slug } = node.fields const doc = { slug, title: node.fields.Unique_Name, } store[slug] = { title: doc.title, } this.add(doc) } }) const json = { index: index.toJSON(), store } cache.set(cacheKey, json) return json }
We opted for instant search, which means that search is triggered by any change in the search input instead of a form submission.
/* src/components/searchwidget.js */ import React, { useState } from "react" import lunr, { Index } from "lunr" import { graphql, useStaticQuery } from "gatsby" import SearchResults from "./searchresults"
const SearchWidget = () => { const [value, setValue] = useState("") // results is now a state variable const [results, setResults] = useState([])
// Since it's not a page component, useStaticQuery for quering data // https://www.gatsbyjs.org/docs/use-static-query/ const { LunrIndex } = useStaticQuery(graphql` query { LunrIndex } `) const index = Index.load(LunrIndex.index) const { store } = LunrIndex const handleChange = e => { const query = e.target.value setValue(query) try { const search = index.search(query).map(({ ref }) => { return { slug: ref, ...store[ref], } }) setResults(search) } catch (error) { console.log(error) } } return ( <div className="search-wrapper"> // You can use a form tag as well, as long as we prevent the default submit behavior <div role="search"> <label htmlFor="search-input" className="visually-hidden"> Search Tartans by Name </label> <input id="search-input" type="search" value={value} onChange={handleChange} placeholder="Search Tartans by Name" /> </div> <SearchResults results={results} /> </div> ) } export default SearchWidget
The SearchResults are structured like this:
/* src/components/searchresults.js */ import React from "react" import { Link } from "gatsby" const SearchResults = ({ results }) => ( <div> {results.length ? ( <> <h2>{results.length} tartan(s) matched your query</h2> <ul> {results.map(result => ( <li key={result.slug}> <Link to={`/tartan/${result.slug}`}>{result.title}</Link> </li> ))} </ul> </> ) : ( <p>Sorry, no matches found.</p> )} </div> ) export default SearchResults
Making it persistent
Where should we use this component? We could add it to the Layout component. The problem is that our search form will get unmounted on page changes that way. If a user wants to browser all tartans associated with the “Ramsay” clan, they will have to retype their query several times. That’s not ideal.
Thomas Weibenfalk has written a great article on keeping state between pages with local state in Gatsby.js. We will use the same technique, where the wrapPageElement browser API sets persistent UI elements around pages.
Let’s add the following code to the gatsby-browser.js. You might need to add this file to the root of your project.
/* gatsby-browser.js */ import React from "react" import SearchWrapper from "./src/components/searchwrapper" export const wrapPageElement = ({ element, props }) => ( <SearchWrapper {...props}>{element}</SearchWrapper> )
Now let’s add a new component file:
touch src/components/searchwrapper.js
Instead of adding SearchWidget component to the Layout, we will add it to the SearchWrapper and the magic happens.

/* src/components/searchwrapper.js */ import React from "react" import SearchWidget from "./searchwidget"
const SearchWrapper = ({ children }) => ( <> {children} <SearchWidget /> </> ) export default SearchWrapper
Creating a custom search query
At this point, I started to try different keywords but very quickly realized that Lunr’s default search query might not be the best solution when used for instant search.
Why? Imagine that we are looking for tartans associated with the name MacCallum. While typing “MacCallum” letter-by-letter, this is the evolution of the results:
m – 2 matches (Lyon, Jeffrey M, Lyon, Jeffrey M (Hunting))
ma – no matches
mac – 1 match (Brighton Mac Dermotte)
macc – no matches
macca – no matches
maccal – 1 match (MacCall)
maccall – 1 match (MacCall)
maccallu – no matches
maccallum – 3 matches (MacCallum, MacCallum #2, MacCallum of Berwick)
Users will probably type the full name and hit the button if we make a button available. But with instant search, a user is likely to abandon early because they may expect that the results can only narrow down letters are added to the keyword query.
That’s not the only problem. Here’s what we get with “Callum”:
c – 3 unrelated matches
ca – no matches
cal – no matches
call – no matches
callu – no matches
callum – one match
You can see the trouble if someone gives up halfway into typing the full query.
Fortunately, Lunr supports more complex queries, including fuzzy matches, wildcards and boolean logic (e.g. AND, OR, NOT) for multiple terms. All of these are available either via a special query syntax, for example:
index.search("+*callum mac*")
We could also reach for the index query method to handle it programatically.
The first solution is not satisfying since it requires more effort from the user. I used the index.query method instead:
/* src/components/searchwidget.js */ const search = index .query(function(q) { // full term matching q.term(el) // OR (default) // trailing or leading wildcard q.term(el, { wildcard: lunr.Query.wildcard.LEADING | lunr.Query.wildcard.TRAILING, }) }) .map(({ ref }) => { return { slug: ref, ...store[ref], } })
Why use full term matching with wildcard matching? That’s necessary for all keywords that “benefit” from the stemming process. For example, the stem of “different” is “differ.” As a consequence, queries with wildcards — such as differe*, differen* or different* — all result in no matches, while the full term queries differe, differen and different return matches.
Fuzzy matches can be used as well. In our case, they are allowed uniquely for terms of five or more characters:
q.term(el, { editDistance: el.length > 5 ? 1 : 0 }) q.term(el, { wildcard: lunr.Query.wildcard.LEADING | lunr.Query.wildcard.TRAILING, })
The handleChange function also “cleans up” user inputs and ignores single-character terms:
/* src/components/searchwidget.js */ const handleChange = e => { const query = e.target.value || "" setValue(query) if (!query.length) { setResults([]) } const keywords = query .trim() // remove trailing and leading spaces .replace(/\*/g, "") // remove user's wildcards .toLowerCase() .split(/\s+/) // split by whitespaces // do nothing if the last typed keyword is shorter than 2 if (keywords[keywords.length - 1].length < 2) { return } try { const search = index .query(function(q) { keywords // filter out keywords shorter than 2 .filter(el => el.length > 1) // loop over keywords .forEach(el => { q.term(el, { editDistance: el.length > 5 ? 1 : 0 }) q.term(el, { wildcard: lunr.Query.wildcard.LEADING | lunr.Query.wildcard.TRAILING, }) }) }) .map(({ ref }) => { return { slug: ref, ...store[ref], } }) setResults(search) } catch (error) { console.log(error) } }
Let’s check it in action:
m – pending
ma – 861 matches
mac – 600 matches
macc – 35 matches
macca – 12 matches
maccal – 9 matches
maccall – 9 matches
maccallu – 3 matches
maccallum – 3 matches
Searching for “Callum” works as well, resulting in four matches: Callum, MacCallum, MacCallum #2, and MacCallum of Berwick.
There is one more problem, though: multi-terms queries. Say, you’re looking for “Loch Ness.” There are two tartans associated with that term, but with the default OR logic, you get a grand total of 96 results. (There are plenty of other lakes in Scotland.)
I wound up deciding that an AND search would work better for this project. Unfortunately, Lunr does not support nested queries, and what we actually need is (keyword1 OR *keyword*) AND (keyword2 OR *keyword2*).
To overcome this, I ended up moving the terms loop outside the query method and intersecting the results per term. (By intersecting, I mean finding all slugs that appear in all of the per-single-keyword results.)
/* src/components/searchwidget.js */ try { // andSearch stores the intersection of all per-term results let andSearch = [] keywords .filter(el => el.length > 1) // loop over keywords .forEach((el, i) => { // per-single-keyword results const keywordSearch = index .query(function(q) { q.term(el, { editDistance: el.length > 5 ? 1 : 0 }) q.term(el, { wildcard: lunr.Query.wildcard.LEADING | lunr.Query.wildcard.TRAILING, }) }) .map(({ ref }) => { return { slug: ref, ...store[ref], } }) // intersect current keywordSearch with andSearch andSearch = i > 0 ? andSearch.filter(x => keywordSearch.some(el => el.slug === x.slug)) : keywordSearch }) setResults(andSearch) } catch (error) { console.log(error) }
The source code for tartanify.com is published on GitHub. You can see the complete implementation of the Lunr search there.
Final thoughts
Search is often a non-negotiable feature for finding content on a site. How important the search functionality actually is may vary from one project to another. Nevertheless, there is no reason to abandon it under the pretext that it does not tally with the static character of Jamstack websites. There are many possibilities. We’ve just discussed one of them.
And, paradoxically in this specific example, the result was a better all-around user experience, thanks to the fact that implementing search was not an obvious task but instead required a lot of deliberation. We may not have been able to say the same with an over-the-counter solution.
The post How to Add Lunr Search to your Gatsby Website appeared first on CSS-Tricks.
source https://css-tricks.com/how-to-add-lunr-search-to-your-gatsby-website/
from WordPress https://ift.tt/3eKOx2M via IFTTT
0 notes
Text
Production Ready with React Training

Hello there, and Happy 2020!
At RisingStack, besides working on consulting and outsourced development projects, we're actively training engineering teams as well, ranging in size from 5 to 25 ppl at a time.
You might already know that we have 2-days-long training agendas for
Node.js
React
Kubernetes
Microservices
These training opportunities are regularly popping up in major European cities, and are also available for companies who'd like to train their engineers on-site, wherever that may be.
In December we prepared a new, 5-days-long training agenda for engineering teams who'd like to dive deep into React and Node, but have little to none experience with these technologies.
Below you can read the full training agenda for the React training, and you can also check out the 5-days-long Node.js Training Agenda in another blogpost.
In case you have any questions about our training agendas, or if you'd like to invite us, reach out to me at [email protected], or use the contact form on our training page.
I'll get back to you within 24 hrs.
This React Training is for developers who:
want to improve their front-end skills,
want to build application prototypes rapidly,
want to create complex and maintainable websites with React
The goal of the training sessions is to
teach JavaScript and React fundamentals.
teach how to create complex and maintainable websites with React.
teach how to write performant front-end code with React, with the latest UX best-practices in mind.
Prerequisites
Basic JavaScript and HTML knowledge needed.
No prior React knowledge is required.
Other info
This training agenda is delivered throughout 5 days.
The training relies heavily on hands-on exercises. During the training, we're building a social networking site.
Full Training Agenda
React primer
Setting up a React project
JSX and rendering
Creating React components
Handling state
Project design and structuring
Performance optimization
The new way of writing React: Hooks
Revising and covering more exotic use cases
Complex state management with third-party libraries
Networking on the client-side
Routing with User Experience in mind
Creating a real-world React app
1. React primer
We will discuss the basics of front-end applications, then learn what React is and when to use it. After that, you will learn the core principles behind React - like components and the vDOM.
Vanilla JS vs. jQuery vs. Modern Frontend Frameworks
When to use React
Components and their benefits
Introducing the virtual DOM
React vs. other frameworks: the difference between a view layer and full frameworks
The current state and the future of React: async rendering and hooks vs. lifecycle
2. Setting up a React project
You will learn how to bootstrap a React application in seconds with create-react-app and jump straight into development. We will cover the basics of writing components and the development flow.
1-minute setup with create-react-app
Writing our first dummy app
Introducing the basic programming and dev tools
Creating our first production build
What happens behind the scenes of create-react-app?
3. JSX and rendering
You will learn what JSX is and its relation to HTML and JavaScript. After that, we will discuss when do React components render and what exactly happens during a render.
The relation of JSX to JS and HTML
Common JS syntax patterns that you will use inside JSX: like conditional rendering and spreading
Inspecting how renders affect the DOM
The syntactical differences between JSX and HTML
What are JSX fragments
What happens with JSX during the build
4. Creating React components
We will take a deeper dive into React components - explaining the different ways of writing them. After that, we will learn how to handle user-triggered and lifecycle events.
Class-based and function components
Event handling
Synthetic React events vs. DOM events
Lifecycle events
5. Handling state
We will learn how to handle local state inside components, how to split complex apps into multiple components, and how to share state with child components.
Handling local state
Controlled components and uncontrolled components
Passing props to child components
Lifting the state up: when and how to do it
The problems with props and handling state in big apps with React context
6. Project design and structuring
We will discuss best practices for project structuring and component design. We will learn the difference between stateful and stateless components and the difference between container & presentational components.
Project structuring
Stateful and stateless components
Containers and presentational components
7. Performance optimization
React has a few key concepts which boost performance significantly. Knowing these and applying them during development can save you from a lot of post-project optimization headache.
Avoiding redundant renders with PureComponent, shouldComponentUpdate and memo
Using keys to render lists: why are keys required and what do they do
Common design mistakes that slow down websites
8. The new way of writing React: Hooks
Hooks are the new way of writing React logic. They are co-existing with lifecycle events, but they fundamentally differ from them. We will discuss the benefits and drawbacks of both and your opinion about them.
From mixins to lifecycles to hooks: the benefit of hooks and why were they added
Writing an app with the most commonly used React hooks
The rules of hooks and what happens if you violate them
Writing a simple useWindowSize hook
How hooks work behind the scenes
Your opinion about hooks vs. old-school lifecycles
9. Revising and covering more exotic use cases
React has an amazingly well written and terse documentation. We will go through the docs, discuss what we already know, and learn what we did not cover so far.
Avoiding redundant renders with PureComponent, shouldComponentUpdate, and memo
Using keys to render lists: why are keys required and what do they do
Common design mistakes that slow down websites
10. Complex state management with third-party libraries
We will discuss when to use React’s own setState and when to use more third-party state management solutions, then learn how to manage complex state and handle async state changes.
Why is React’s own setState not enough: handling large scale global state
Learning the basics of Redux
Writing an app with redux and react-redux
Handling async actions
The idea behind and redux and it’s benefits
Covering other - fundamentally different - state management alternatives: like MobX and Apollo Link State
11. Networking on the client-side
You will learn how to fetch data from an API server and how to handle async events.
Handling async networking
Updating the state
A quick glance at GraphQL and when to use it
12.Routing with User Experience in mind
You will learn how to implement user-friendly routing with pages and links, then we’ll move on to programmatic routing. We will also cover protected routes with redirects and handling query parameters.
Introducing React Router
Creating a simple multi-page app with links
Handling redirects and private pages
Nested routing
Keeping the minimal state in query parameters
13. Creating a real-world React app
You will learn how to rapidly develop and deploy front-end apps while keeping them maintainable.
Rapid app bootstrapping and development
UX considerations, project management, and structuring
Graceful error handling
Refactoring apps as they grow
Deploying apps on Netlify
Production Ready with React Training published first on https://koresolpage.tumblr.com/
0 notes
Text
Concept of React Router
React Router is a powerful library that enables seamless navigation and routing in React applications. Understanding the core concepts of React Router is essential for building dynamic, user-friendly single-page applications. This guide covers the fundamental concepts and provides practical examples to help you master React Router.
Core Concepts of React Router
1. Router Component
The Router component is the foundation of React Router. It wraps your entire application and enables routing functionality.
BrowserRouter: Uses the HTML5 history API to keep your UI in sync with the URL.
HashRouter: Uses the hash portion of the URL (i.e., window.location.hash) to keep your UI in sync with the URL.
import { BrowserRouter } from 'react-router-dom';
function App() { return ( ); }
export default App;
2. Route Component
The Route component is used to define a mapping between a URL path and a component. It renders the specified component when the URL matches the path.
import { Route, Routes } from 'react-router-dom';
function App() { return ( } /> } /> } /> ); }
function Home() { return
Home Page
; }
function About() { return
About Page
; }
function Contact() { return
Contact Page
; }
3. Link Component
The Link component is used to create navigational links in your application. It works similarly to an HTML anchor tag but prevents full-page reloads.
import { Link } from 'react-router-dom';
function Navbar() { return ( Home About Contact ); }
4. useNavigate Hook
The useNavigate hook allows you to programmatically navigate to different routes.
import { useNavigate } from 'react-router-dom';
function Home() { const navigate = useNavigate();
const goToAbout = () => { navigate('/about'); };
return (
Home Page
Go to About ); }
5. Dynamic Routing
Dynamic routing allows you to pass parameters through the URL. This is useful for creating pages that depend on dynamic data, such as user profiles or product details.
import { useParams } from 'react-router-dom';
function App() { return ( } /> ); }
function User() { const { id } = useParams(); return
User ID: {id}
; }
6. Nested Routes
Nested routes allow you to define routes within other routes. This is particularly useful for layouts that require sub-sections, such as dashboards.
function Dashboard() { return (
Dashboard
} /> } /> ); }
function Profile() { return
Profile Page
; }
function Settings() { return
Settings Page
; }
7. Protected Routes
Protected routes restrict access to certain parts of your application based on authentication status.
import { Navigate } from 'react-router-dom';
function ProtectedRoute({ element, isAuthenticated }) { return isAuthenticated ? element : ; }
function App() { const isAuthenticated = false; // Replace with actual authentication logic
return ( } /> } /> } />} /> ); }
8. Handling 404 Pages
Handling 404 pages ensures that users are informed when they navigate to an undefined route.
function NotFound() { return
404 Not Found
; }
function App() { return ( } /> } /> } /> ); }
Diagram: Basic React Router Flow
graph LR A[BrowserRouter] --> B[Routes] B --> C[Route path="/"] B --> D[Route path="/about"] B --> E[Route path="/contact"] B --> F[Route path="*"] C --> G[Home] D --> H[About] E --> I[Contact] F --> J[NotFound]
Conclusion
Mastering React Router is crucial for building efficient and user-friendly React applications. By understanding and utilizing its core concepts—such as Router, Route, Link, and dynamic routing—you can create a seamless navigation experience for your users. Explore these concepts further and practice implementing them to enhance your React development skills.
Hope you liked the article on React Router for any query visit: https://reactmasters.in/ or free demo sessions kindly contact us at Mob:+91 84660 44555
0 notes
Text
Understanding next.js useRouter

Next.js is a popular framework for building React applications. It provides many features that make developing web applications easier, including client-side routing. One of the key tools in Next.js for handling routing is the useRouter hook. In this article, we will explore what useRouter is and how it can be used effectively in Next.js applications.
1. Introduction to useRouter
The useRouter hook is a built-in hook provided by Next.js. It allows us to access and manipulate the current page's routing information. With useRouter, we can extract data from the URL, handle dynamic routing, process query parameters, and perform page redirection. https://nextjs.org/docs/pages/api-reference/functions/use-router
2. Benefits of using useRouter
Using the useRouter hook in Next.js offers several benefits: Simplified routing setup: useRouter simplifies the process of setting up routing in Next.js applications. It provides an intuitive interface for handling routing-related tasks. Dynamic routing support: With useRouter, implementing dynamic routing becomes straightforward. You can use dynamic parameters in the URL to generate pages dynamically. Query parameter handling: useRouter makes it easy to extract and process query parameters from the URL. Page redirection: useRouter enables seamless page redirection based on specific conditions or user interactions.
3. Handling dynamic routing with useRouter
Let's explore how to implement dynamic routing using the useRouter hook. First, create a file named .js in the pages directory. Here, represents the dynamic part of the URL. Inside this file, you can use useRouter to handle dynamic routing. Origin : https://worldgoit.com/archives/posts/software-development/understanding-next-js-userouter/ Read the full article
0 notes
Text
Building Desktop Apps With Electron And Vue
About The Author
Front-end developer based in Lagos, Nigeria. He enjoys converting designs into code and building things for the web. More about Timi …
Electron is an open-source software framework developed and maintained by GitHub. It allows for the development of desktop GUI applications using web technologies. In this tutorial, Timi Omoyeni explains what you need to keep in mind when building a desktop application with Vue.js using the Vue CLI Plugin Electron Builder.
JavaScript used to be known as the language for building websites and web applications especially with some of its frameworks such as React, Vue, and Angular but over time (as early as 2009), it became possible for JavaScript to run outside the browser with the emergence of Node.js, an open-source, cross-platform, JavaScript runtime environment that executes JavaScript code outside a web browser. This has led to the ability to use JavaScript for a whole lot more than just web applications, and one of which is building desktop applications using Electron.js.
Electron enables you to create desktop applications with pure JavaScript by providing a runtime with rich native (operating system) APIs. You can see it as a variant of the Node.js runtime that is focused on desktop applications instead of web servers.
In this tutorial, we’re going to learn how to build desktop applications using Electron, we’re also going to learn how to use Vuejs to build Electron applications.
Note: Basic knowledge of Vue.js and the Vue CLI is required to follow this tutorial. All of the code used in this tutorial can be found on my GitHub. Feel free to clone and play around with it!
What Are Desktop Applications?
Desktop applications are applications that run stand-alone in desktop or laptop computers. They are applications that perform specific tasks and are installed solely for this purpose.
An example of a desktop application is your Microsoft Word, which is used for creating and typing documents. Other examples of common desktop applications are web browsers, Visual Studio Code, and Adobe Photoshop. Desktop applications are different from web applications because you have to install the desktop application in order for you to access and make use of it, and they sometimes do not need internet access for them to work. Web apps, on the other hand, can be accessed by simply visiting the URL that such an app is hosted on and always need internet access before you can access them.
Examples of frameworks used in building desktop apps include:
Java Java is a general-purpose programming language that is class-based, object-oriented, and designed to have as few implementation dependencies as possible. It is intended to let application developers write once, run anywhere (WORA), meaning that compiled Java code can run on all platforms that support Java without the need for recompilation.
Java FX According to their official documentation, it is an open-source, next-generation client application platform for desktop, mobile, and embedded systems built on Java.
C# C# is a general-purpose, multi-paradigm programming language encompassing strong typing, lexically scoped, imperative, declarative, functional, generic, object-oriented, and component-oriented programming disciplines.
.NET .NET is a free, cross-platform, open-source developer platform for building many different types of applications. With .NET, you can use multiple languages, editors, and libraries to build for web, mobile, desktop, gaming, and IoT.
What Is Electron?
Electron is an open-source framework for building desktop applications. It was formerly known as ‘Atom shell’ and is developed and maintained by GitHub. It lets you write cross-platform desktop applications using HTML, CSS, and JavaScript. This means that you can build desktop applications for Windows, MacOS and other platforms using one code base. It is based on Node.js and Chromium. Examples of applications built with Electron include the popular Atom editior, Visual Studio Code, WordPress for desktop, and Slack.
Installation
You can install Electron in your project using NPM:
npm install electron --save-dev
You can also install it globally if you’re going to be working with electron apps a lot using this command:
npm install electron -g
Building Vuejs Apps For Desktop With Electron
If you’re familiar with building web applications using Vuejs, it is possible to build desktop applications using Vuejs. All you need for this is the Vue CLI Plugin Electron Builder.
The Vue CLI Plugin Electron Builder
This tool allows you to build Vue apps for desktop with Electron, this means that it makes your Vue application work as an electron app. This means that your Vue application which possibly is a web application can be extended to work in desktop environments without the need to build a separate desktop application in another framework. This gives Vue developers the option and power to go beyond the web. Going forward, you can work on that idea you have and give users a desktop application option — one that can run on Windows, macOS, and LinUX.
To see this in action, we’re going to be building a News app using the News API. The application will provide breaking news headlines and allow you to search for articles from news sources and blogs all over the web with their API. All you need to get started with them is your personal API key which can be gotten from here.
We’ll be building a simple app that offers the following:
A page that displays top and breaking headlines from a selected country with the option to choose a country using their /top-headlines endpoint. News API provides news from a list of countries that they support, find the list here.
News from a selected category using a combination of their /everything endpoint and a query parameter q with which we’ll specify our category.
After getting your API Key, we can create our application using the Vue CLI. Ensure you have the Vue CLI installed on your system, if you do not, install it using this command:
npm install -g @vue/cli # OR yarn global add @vue/cli
Once this is done, create your News app using the CLI:
vue create news-app
We’ll fetch the data from the News API by using Axios for this tutorial, but you can use any alternative you’re more comfortable with. You can install Axios by using any of the following commands:
//NPM npm install axios // YARN yarn add axios
The next step would be to set up an Axios instance for global config in our application. We’re going to be creating a plugins folder in the src folder where we’ll create this axios.js file. After creating the file, add the following lines of code:
import axios from "axios"; let baseURL = `https://newsapi.org/v2`; let apiKey = process.env.VUE_APP_APIKEY; const instance = axios.create({ baseURL: baseURL, timeout: 30000, headers: { "X-Api-Key": apiKey, }, }); export default instance;
Here, we define our baseURL and apiKey which we got from News API and pass it to a new instance of Axios. This instance accepts the baseURL and apiKey together with a timeout property. News API requires you to add your API Key when making a request to their API and offers 3 ways to attach it to your request but here, we’re adding it to the header X-Api-Key property after which we export instance. Once this is done, we can now use this config for all our Axios requests in our app.
When this is done, you can add the Plugin Electron builder with the CLI using this command:
vue add electron-builder
You’ll be prompted to select your preferred Electron version, I selected version 9.0.0 because it is the latest version of Electron (at the time of writing).
When this is done, you can now serve your application using this command:
Using Yarn(strongly recommended) yarn electron:serve OR NPM npm run electron:serve
This will take some time to compile and serve your app. When that is done, your application will pop open on your system, this should look like this:
Auto-open state of your electron app. (Large preview)
If you close the devtools of your app, it should look like this:
Landing page your app. (Large preview)
This electron plugin is super helpful and easy to use because every part of the development of this app works the same way as a Vue app. This means you can have one codebase for both your web application and desktop app. Our app will have three parts:
A landing page that renders top news from a country chosen at random.
A page for rendering top news from the user’s country of choice.
A page that renders top news from a category of the user’s selection.
For this, we’re going to be needing a header component for all our nav links. So let us create a file in the components folder and name it header.vue, and afterward add the following lines of code to it:
<template> <header class="header"> <div class="logo"> <div class="logo__container"> <img src="../assets/logo.png" alt="News app logo" class="logo__image" /> </div> <h1>News App</h1> </div> <nav class="nav"> <h4 class="nav__link"> <router-link to="/home">Home</router-link> </h4> <h4 class="nav__link"> <router-link to="/top-news">Top News</router-link> </h4> <h4 class="nav__link"> <router-link to="/categories">News By Category</router-link> </h4> </nav> </header> </template> <script> export default { name: "app-header", }; </script> <style> .header { display: flex; flex-wrap: wrap; justify-content: space-between; } .logo { display: flex; flex-wrap: nowrap; justify-content: space-between; align-items: center; height: 50px; } .logo__container { width: 50px; height: 50px; } .logo__image { max-width: 100%; max-height: 100%; } .nav { display: flex; flex-wrap: wrap; width: 350px; justify-content: space-between; } </style>
Here, we create a header component that has our app name and logo (image can be found on my GitHub) together with a nav section that contains links to the other parts of our application. The next thing would be to import this page on our layout page — App.vue so we can see our header on every page.
<template> <div id="app"> <app-header /> <router-view /> </div> </template> <script> import appHeader from "@/components/Header.vue"; export default { name: "layout", components: { appHeader, }, }; </script> <style> @import url("https://fonts.Googleapis.com/css2?family=Abel&family=Staatliches&display=swap"); html, #app { min-height: 100vh; } #app { font-family: "Abel", sans-serif; -webkit-font-smoothing: antialiased; -moz-osx-font-smoothing: grayscale; text-align: center; color: #2c3e50; background-color: #fff; } #app h1 { font-family: "Staatliches", cursive; } a { font-weight: bold; color: #2c3e50; text-decoration: none; } a:hover { text-decoration: underline; } a.router-link-exact-active { color: #42b983; } </style>
Here, we replace the default content in the template section with our newly created header component after we have imported and declared it in the script section. Finally, we add some styling for the whole app in the style section.
Now if we try to view our app, it should look like this:
Empty landing page. (Large preview)
The next step would be to add content to our Home.vue file. This page would host the first section of our app; Top news from a country selected at random. Update your Home.vue file with the following lines of code:
<template> <section class="home"> <h1>Welcome to News App</h1> <h4>Displaying Top News from </h4> <div class="articles__div" v-if="articles"> <news-card v-for="(article, index) in articles" :key="index" :article="article" ></news-card> </div> </section> </template> <script> import { mapActions, mapState } from "vuex"; import NewsCard from "../components/NewsCard"; export default { data() { return { articles: "", countryInfo: "", }; }, components: { NewsCard, }, mounted() { this.fetchTopNews(); }, computed: { ...mapState(["countries"]), }, methods: { ...mapActions(["getTopNews"]), async fetchTopNews() { let countriesLength = this.countries.length; let countryIndex = Math.floor( Math.random() * (countriesLength - 1) + 1 ); this.countryInfo = this.countries[countryIndex]; let { data } = await this.getTopNews( this.countries[countryIndex].value ); this.articles = data.articles; }, }, }; </script> <style> .articles__div { display: flex; flex-wrap: wrap; justify-content: center; } </style>
In the script section of this file, we import mapState and mapActions from Vuex, which we’ll be using later on in this file. We also import a NewsCard component (we’ll create this next) that would render all news headlines on this page. We then make use of the fetchTopNews method to fetch the latest news from a country selected at random from the array of countries in our store. This country is passed to our getTopNews action, this would be appended to the baseURL as a query for a country like so baseURL/top-news?country=${randomCountry}. Once this is done, we loop through this data and pass it to the article prop of our Newscard component in the template section. We also have a paragraph that indicates which country the top news is from.
The next thing would be to set up our NewsCard component that will display this news. Create a new file inside your components folder, name it NewsCard.vue, and add the following lines of code to it:
<template> <section class="news"> <div class="news__section"> <h1 class="news__title"> <a class="article__link" :href="article.url" target="_blank"> </a> </h1> <h3 class="news__author" v-if="article.author"></h3> <!-- <p class="article__paragraph"></p> --> <h5 class="article__published"></h5> </div> <div class="image__container"> <img class="news__img" src="../assets/logo.png" :data-src="article.urlToImage" :alt="article.title" /> </div> </section> </template> <script> export default { name: "news-card", props: { article: Object, }, mounted() { this.lazyLoadImages(); }, methods: { lazyLoadImages() { const images = document.querySelectorAll(".news__img"); const options = { // If the image gets within 50px in the Y axis, start the download. root: null, // Page as root rootMargin: "0px", threshold: 0.1, }; const fetchImage = (url) => { return new Promise((resolve, reject) => { const image = new Image(); image.src = url; image.onload = resolve; image.onerror = reject; }); }; const loadImage = (image) => { const src = image.dataset.src; fetchImage(src).then(() => { image.src = src; }); }; const handleIntersection = (entries) => { entries.forEach((entry) => { if (entry.intersectionRatio > 0) { loadImage(entry.target); } }); }; // The observer for the images on the page const observer = new IntersectionObserver(handleIntersection, options); images.forEach((img) => { observer.observe(img); }); }, }, }; </script> <style> .news { width: 100%; display: flex; flex-direction: row; align-items: flex-start; max-width: 550px; box-shadow: 2px 1px 7px 1px #eee; padding: 20px 5px; box-sizing: border-box; margin: 15px 5px; border-radius: 4px; } .news__section { width: 100%; max-width: 350px; margin-right: 5px; } .news__title { font-size: 15px; text-align: left; margin-top: 0; } .news__author { font-size: 14px; text-align: left; font-weight: normal; } .article__published { text-align: left; } .image__container { width: 100%; max-width: 180px; max-height: 180px; } .news__img { transition: max-width 300ms cubic-bezier(0.4, 0, 1, 1), max-height 300ms cubic-bezier(0.4, 0, 1, 1); max-width: 150px; max-height: 150px; } .news__img:hover { max-width: 180px; max-height: 180px; } .article__link { text-decoration: none; color: inherit; } </style>
Here, we display data passed into this component using the article object prop. We also have a method that lazy loads the images attached to each article. This method loops through the number of article images we have and lazy loads them when they become visible. Finally, we have styles targeted at this component in the style section.
The next thing will be to set up our store so we can start getting the latest news. Add the following lines of code to your index.js file:
import Vue from "vue"; import Vuex from "vuex"; import axios from "../plugins/axios"; Vue.use(Vuex); const store = new Vuex.Store({ state: { countries: [{ name: "United States of America", value: "us", }, { name: "Nigeria", value: "ng", }, { name: "Argentina", value: "ar", }, { name: "Canada", value: "ca", }, { name: "South Africa", value: "za", }, ], categories: [ "entertainment", "general", "health", "science", "business", "sports", "technology", ], }, mutations: {}, actions: { async getTopNews(context, country) { let res = await axios({ url: `/top-headlines?country=${country}`, method: "GET", }); return res; }, }, }); export default store;
We are adding two properties to our store, one of these properties is countries. This property contains an array of countries’ object. We also have the categories property; this contains an array of available categories on the News API. The reader will like the freedom to view the top news from specific countries and categories; this will also be needed in more than one part of the app and that is why we’re making use of the store. In the actions section of our store, we have a getTopNews method that fetches top news from a country(this country was passed from the component that called this action).
At this point, if we open our app, we should see our landing page that looks like this:
Updated landing page. (Large preview)
The background.js file
This file is the entry point for Electron into your app. It controls all the Desktop app-like settings for this app. The default state of this file can be found on my GitHub.
In this file, we have some predefined configurations set for the app such as the default height and width for your app. Let’s take a look at some of the things you can do in this file.
Enabling the Vuejs devtools
By default, you have access to dev tools in Electron but it is not enabled after installation. This is as a result of an existing bug on windows 10, so if you open you background.js file, you will find some commented out code with comments that state why they’re commented out:
// Install Vue Devtools // Devtools extensions are broken in Electron 6.0.0 and greater // See https://github.com/nklayman/vue-cli-plugin-electron-builder/issues/378 for more info // Electron will not launch with Devtools extensions installed on Windows 10 with dark mode // If you are not using Windows 10 dark mode, you may uncomment these lines // In addition, if the linked issue is closed, you can upgrade electron and uncomment these lines // try { // await installVueDevtools() // } catch (e) { // console.error('Vue Devtools failed to install:', e.toString()) // }
So if you’re not affected by this bug, you can uncomment the try/catch block and also search for installVueDevtools in this same file(line 5) and also uncomment it. Once this is done, your app will automatically restart, and when you check your dev tools, you should see the Vuejs Devtools.
Vuejs in devtools. (Large preview)
Selecting A Custom Icon For Your App
By default, the Electron icon is set as the default icon for your app, and most of the time, you probably would like to set your own custom icon. To do this, move your icon into your public folder, and rename it to be icon.png. The next thing to do would be to add the required dependency, electron-icon-builder.
You can install it using any of the following commands:
// With Yarn: yarn add --dev electron-icon-builder // or with NPM: npm install --save-dev electron-icon-builder
Once this is done, you can run this next command. It will convert your icon into Electron format and print the following in your console when this done.
Generated info in terminal. (Large preview)
The next thing would be to set the icon option in background.js file. This option goes inside the BrowserWindow option that is imported from Electron. To do this, update BrowserWindow to look like this:
// Add this to the top of your file /* global __static */ // import path import path from 'path' // Replace win = new BrowserWindow({ width: 800, height: 600 }) // With win = new BrowserWindow({ width: 800, height: 600, icon: path.join(__static, 'icon.png') })
Now if we run yarn run electron:build and view our app, we should see the updated icon being used as the app icon but it doesn’t change in development. This issue helps address a manual fix for it on macOS.
Setting Title For Your App
You will notice the title of your app is set to the app name (news-app in this case) and we’ll need to change it. To do that, we have to add a title property to the BrowserWindow method in our background.js file like this:
win = new BrowserWindow({ width: 600, height: 500, title: "News App", icon: path.join(__static, "icon.png"), webPreferences: { // Use pluginOptions.nodeIntegration, leave this alone // See nklayman.github.io/vue-cli-plugin-electron-builder/guide/security.html#node-integration for more info nodeIntegration: process.env.ELECTRON_NODE_INTEGRATION, }, });
Here, we’re setting the title of our app to ‘News App’. But if your index.html file has a title selected or your title doesn’t change to this, try adding this code to your file:
win.on("page-title-updated", (event) => event.preventDefault());
We’re listening for an event that gets fired when our title is updated from BrowserWindow. When this event is fired, we’re telling Electron not to update the title with the one found in index.html file.
Another thing that might be worth changing is the productName, this controls what name appears when you hover on your app’s icon or what your computer recognizes the app as. Right now, the name of our app is Electron. To change this name in production, create a vue.config.js file and add the following lines of code to it:
module.exports = { pluginOptions: { electronBuilder: { builderOptions: { productName: "News App", }, }, }, };
Here, we define productName to be ‘News App’ so that when we run the build command for our app, the name changes from ‘Electron’ to ‘News App’.
Multi Platform Build
By default, when you run the build command, the app that gets created is dependent on the platform that it is being run on. This means if you run the build command on LinUX, the app that gets created would be a LinUX desktop app. The same also applies to other platforms(macOS and windows). But Electron comes with the option to specify a platform (or two platforms) you want to generate. The available options are:
mac
win
linUX
So in order to build the Windows version of your app, run the following command:
// NPM npm electron:build -- --win nsis // YARN yarn electron:build --win nsis
Conclusion
The completed application can be found on my GitHub. The official Electron documentation provides information and a guide that helps you customize your desktop app whichever way you want. Some of the things I tried out but aren’t included in this tutorial are:
Customizing your dock on macOS — https://www.electronjs.org/docs/tutorial/macos-dock.
Setting resizeable, maximizable, and many more — https://github.com/electron/electron/blob/master/docs/api/browser-window.md#new-browserwindowoptions.
So if you’re looking to do much more with your Electron application, their official docs is a good place to start.
Related Resources
Node.jshttps://en.wikipedia.org/wiki/Node.js
Java (programming language)https://en.wikipedia.org/wiki/Java_(programming_language)
Electron (software framework)
JavaFX 14
electronjs
Electron Documentation
Vue CLI Plugin Electron Builder
Lazy Loading Images for Performance Using Intersection Observer by Chris Nwamba
axios
Getting Started With Axios In Nuxthttps://www.smashingmagazine.com/2020/05/getting-started-axios-nuxt/) by Timi Omoyeni
(ks, ra, yk, il)
Website Design & SEO Delray Beach by DBL07.co
Delray Beach SEO
source http://www.scpie.org/building-desktop-apps-with-electron-and-vue/ source https://scpie.tumblr.com/post/624279195687747584
0 notes
Text
Building Desktop Apps With Electron And Vue
About The Author
Front-end developer based in Lagos, Nigeria. He enjoys converting designs into code and building things for the web. More about Timi …
Electron is an open-source software framework developed and maintained by GitHub. It allows for the development of desktop GUI applications using web technologies. In this tutorial, Timi Omoyeni explains what you need to keep in mind when building a desktop application with Vue.js using the Vue CLI Plugin Electron Builder.
JavaScript used to be known as the language for building websites and web applications especially with some of its frameworks such as React, Vue, and Angular but over time (as early as 2009), it became possible for JavaScript to run outside the browser with the emergence of Node.js, an open-source, cross-platform, JavaScript runtime environment that executes JavaScript code outside a web browser. This has led to the ability to use JavaScript for a whole lot more than just web applications, and one of which is building desktop applications using Electron.js.
Electron enables you to create desktop applications with pure JavaScript by providing a runtime with rich native (operating system) APIs. You can see it as a variant of the Node.js runtime that is focused on desktop applications instead of web servers.
In this tutorial, we’re going to learn how to build desktop applications using Electron, we’re also going to learn how to use Vuejs to build Electron applications.
Note: Basic knowledge of Vue.js and the Vue CLI is required to follow this tutorial. All of the code used in this tutorial can be found on my GitHub. Feel free to clone and play around with it!
What Are Desktop Applications?
Desktop applications are applications that run stand-alone in desktop or laptop computers. They are applications that perform specific tasks and are installed solely for this purpose.
An example of a desktop application is your Microsoft Word, which is used for creating and typing documents. Other examples of common desktop applications are web browsers, Visual Studio Code, and Adobe Photoshop. Desktop applications are different from web applications because you have to install the desktop application in order for you to access and make use of it, and they sometimes do not need internet access for them to work. Web apps, on the other hand, can be accessed by simply visiting the URL that such an app is hosted on and always need internet access before you can access them.
Examples of frameworks used in building desktop apps include:
Java Java is a general-purpose programming language that is class-based, object-oriented, and designed to have as few implementation dependencies as possible. It is intended to let application developers write once, run anywhere (WORA), meaning that compiled Java code can run on all platforms that support Java without the need for recompilation.
Java FX According to their official documentation, it is an open-source, next-generation client application platform for desktop, mobile, and embedded systems built on Java.
C# C# is a general-purpose, multi-paradigm programming language encompassing strong typing, lexically scoped, imperative, declarative, functional, generic, object-oriented, and component-oriented programming disciplines.
.NET .NET is a free, cross-platform, open-source developer platform for building many different types of applications. With .NET, you can use multiple languages, editors, and libraries to build for web, mobile, desktop, gaming, and IoT.
What Is Electron?
Electron is an open-source framework for building desktop applications. It was formerly known as ‘Atom shell’ and is developed and maintained by GitHub. It lets you write cross-platform desktop applications using HTML, CSS, and JavaScript. This means that you can build desktop applications for Windows, MacOS and other platforms using one code base. It is based on Node.js and Chromium. Examples of applications built with Electron include the popular Atom editior, Visual Studio Code, WordPress for desktop, and Slack.
Installation
You can install Electron in your project using NPM:
npm install electron --save-dev
You can also install it globally if you’re going to be working with electron apps a lot using this command:
npm install electron -g
Building Vuejs Apps For Desktop With Electron
If you’re familiar with building web applications using Vuejs, it is possible to build desktop applications using Vuejs. All you need for this is the Vue CLI Plugin Electron Builder.
The Vue CLI Plugin Electron Builder
This tool allows you to build Vue apps for desktop with Electron, this means that it makes your Vue application work as an electron app. This means that your Vue application which possibly is a web application can be extended to work in desktop environments without the need to build a separate desktop application in another framework. This gives Vue developers the option and power to go beyond the web. Going forward, you can work on that idea you have and give users a desktop application option — one that can run on Windows, macOS, and LinUX.
To see this in action, we’re going to be building a News app using the News API. The application will provide breaking news headlines and allow you to search for articles from news sources and blogs all over the web with their API. All you need to get started with them is your personal API key which can be gotten from here.
We’ll be building a simple app that offers the following:
A page that displays top and breaking headlines from a selected country with the option to choose a country using their /top-headlines endpoint. News API provides news from a list of countries that they support, find the list here.
News from a selected category using a combination of their /everything endpoint and a query parameter q with which we’ll specify our category.
After getting your API Key, we can create our application using the Vue CLI. Ensure you have the Vue CLI installed on your system, if you do not, install it using this command:
npm install -g @vue/cli # OR yarn global add @vue/cli
Once this is done, create your News app using the CLI:
vue create news-app
We’ll fetch the data from the News API by using Axios for this tutorial, but you can use any alternative you’re more comfortable with. You can install Axios by using any of the following commands:
//NPM npm install axios // YARN yarn add axios
The next step would be to set up an Axios instance for global config in our application. We’re going to be creating a plugins folder in the src folder where we’ll create this axios.js file. After creating the file, add the following lines of code:
import axios from "axios"; let baseURL = `https://newsapi.org/v2`; let apiKey = process.env.VUE_APP_APIKEY; const instance = axios.create({ baseURL: baseURL, timeout: 30000, headers: { "X-Api-Key": apiKey, }, }); export default instance;
Here, we define our baseURL and apiKey which we got from News API and pass it to a new instance of Axios. This instance accepts the baseURL and apiKey together with a timeout property. News API requires you to add your API Key when making a request to their API and offers 3 ways to attach it to your request but here, we’re adding it to the header X-Api-Key property after which we export instance. Once this is done, we can now use this config for all our Axios requests in our app.
When this is done, you can add the Plugin Electron builder with the CLI using this command:
vue add electron-builder
You’ll be prompted to select your preferred Electron version, I selected version 9.0.0 because it is the latest version of Electron (at the time of writing).
When this is done, you can now serve your application using this command:
Using Yarn(strongly recommended) yarn electron:serve OR NPM npm run electron:serve
This will take some time to compile and serve your app. When that is done, your application will pop open on your system, this should look like this:
Auto-open state of your electron app. (Large preview)
If you close the devtools of your app, it should look like this:
Landing page your app. (Large preview)
This electron plugin is super helpful and easy to use because every part of the development of this app works the same way as a Vue app. This means you can have one codebase for both your web application and desktop app. Our app will have three parts:
A landing page that renders top news from a country chosen at random.
A page for rendering top news from the user’s country of choice.
A page that renders top news from a category of the user’s selection.
For this, we’re going to be needing a header component for all our nav links. So let us create a file in the components folder and name it header.vue, and afterward add the following lines of code to it:
<template> <header class="header"> <div class="logo"> <div class="logo__container"> <img src="../assets/logo.png" alt="News app logo" class="logo__image" /> </div> <h1>News App</h1> </div> <nav class="nav"> <h4 class="nav__link"> <router-link to="/home">Home</router-link> </h4> <h4 class="nav__link"> <router-link to="/top-news">Top News</router-link> </h4> <h4 class="nav__link"> <router-link to="/categories">News By Category</router-link> </h4> </nav> </header> </template> <script> export default { name: "app-header", }; </script> <style> .header { display: flex; flex-wrap: wrap; justify-content: space-between; } .logo { display: flex; flex-wrap: nowrap; justify-content: space-between; align-items: center; height: 50px; } .logo__container { width: 50px; height: 50px; } .logo__image { max-width: 100%; max-height: 100%; } .nav { display: flex; flex-wrap: wrap; width: 350px; justify-content: space-between; } </style>
Here, we create a header component that has our app name and logo (image can be found on my GitHub) together with a nav section that contains links to the other parts of our application. The next thing would be to import this page on our layout page — App.vue so we can see our header on every page.
<template> <div id="app"> <app-header /> <router-view /> </div> </template> <script> import appHeader from "@/components/Header.vue"; export default { name: "layout", components: { appHeader, }, }; </script> <style> @import url("https://fonts.Googleapis.com/css2?family=Abel&family=Staatliches&display=swap"); html, #app { min-height: 100vh; } #app { font-family: "Abel", sans-serif; -webkit-font-smoothing: antialiased; -moz-osx-font-smoothing: grayscale; text-align: center; color: #2c3e50; background-color: #fff; } #app h1 { font-family: "Staatliches", cursive; } a { font-weight: bold; color: #2c3e50; text-decoration: none; } a:hover { text-decoration: underline; } a.router-link-exact-active { color: #42b983; } </style>
Here, we replace the default content in the template section with our newly created header component after we have imported and declared it in the script section. Finally, we add some styling for the whole app in the style section.
Now if we try to view our app, it should look like this:
Empty landing page. (Large preview)
The next step would be to add content to our Home.vue file. This page would host the first section of our app; Top news from a country selected at random. Update your Home.vue file with the following lines of code:
<template> <section class="home"> <h1>Welcome to News App</h1> <h4>Displaying Top News from </h4> <div class="articles__div" v-if="articles"> <news-card v-for="(article, index) in articles" :key="index" :article="article" ></news-card> </div> </section> </template> <script> import { mapActions, mapState } from "vuex"; import NewsCard from "../components/NewsCard"; export default { data() { return { articles: "", countryInfo: "", }; }, components: { NewsCard, }, mounted() { this.fetchTopNews(); }, computed: { ...mapState(["countries"]), }, methods: { ...mapActions(["getTopNews"]), async fetchTopNews() { let countriesLength = this.countries.length; let countryIndex = Math.floor( Math.random() * (countriesLength - 1) + 1 ); this.countryInfo = this.countries[countryIndex]; let { data } = await this.getTopNews( this.countries[countryIndex].value ); this.articles = data.articles; }, }, }; </script> <style> .articles__div { display: flex; flex-wrap: wrap; justify-content: center; } </style>
In the script section of this file, we import mapState and mapActions from Vuex, which we’ll be using later on in this file. We also import a NewsCard component (we’ll create this next) that would render all news headlines on this page. We then make use of the fetchTopNews method to fetch the latest news from a country selected at random from the array of countries in our store. This country is passed to our getTopNews action, this would be appended to the baseURL as a query for a country like so baseURL/top-news?country=${randomCountry}. Once this is done, we loop through this data and pass it to the article prop of our Newscard component in the template section. We also have a paragraph that indicates which country the top news is from.
The next thing would be to set up our NewsCard component that will display this news. Create a new file inside your components folder, name it NewsCard.vue, and add the following lines of code to it:
<template> <section class="news"> <div class="news__section"> <h1 class="news__title"> <a class="article__link" :href="article.url" target="_blank"> </a> </h1> <h3 class="news__author" v-if="article.author"></h3> <!-- <p class="article__paragraph"></p> --> <h5 class="article__published"></h5> </div> <div class="image__container"> <img class="news__img" src="../assets/logo.png" :data-src="article.urlToImage" :alt="article.title" /> </div> </section> </template> <script> export default { name: "news-card", props: { article: Object, }, mounted() { this.lazyLoadImages(); }, methods: { lazyLoadImages() { const images = document.querySelectorAll(".news__img"); const options = { // If the image gets within 50px in the Y axis, start the download. root: null, // Page as root rootMargin: "0px", threshold: 0.1, }; const fetchImage = (url) => { return new Promise((resolve, reject) => { const image = new Image(); image.src = url; image.onload = resolve; image.onerror = reject; }); }; const loadImage = (image) => { const src = image.dataset.src; fetchImage(src).then(() => { image.src = src; }); }; const handleIntersection = (entries) => { entries.forEach((entry) => { if (entry.intersectionRatio > 0) { loadImage(entry.target); } }); }; // The observer for the images on the page const observer = new IntersectionObserver(handleIntersection, options); images.forEach((img) => { observer.observe(img); }); }, }, }; </script> <style> .news { width: 100%; display: flex; flex-direction: row; align-items: flex-start; max-width: 550px; box-shadow: 2px 1px 7px 1px #eee; padding: 20px 5px; box-sizing: border-box; margin: 15px 5px; border-radius: 4px; } .news__section { width: 100%; max-width: 350px; margin-right: 5px; } .news__title { font-size: 15px; text-align: left; margin-top: 0; } .news__author { font-size: 14px; text-align: left; font-weight: normal; } .article__published { text-align: left; } .image__container { width: 100%; max-width: 180px; max-height: 180px; } .news__img { transition: max-width 300ms cubic-bezier(0.4, 0, 1, 1), max-height 300ms cubic-bezier(0.4, 0, 1, 1); max-width: 150px; max-height: 150px; } .news__img:hover { max-width: 180px; max-height: 180px; } .article__link { text-decoration: none; color: inherit; } </style>
Here, we display data passed into this component using the article object prop. We also have a method that lazy loads the images attached to each article. This method loops through the number of article images we have and lazy loads them when they become visible. Finally, we have styles targeted at this component in the style section.
The next thing will be to set up our store so we can start getting the latest news. Add the following lines of code to your index.js file:
import Vue from "vue"; import Vuex from "vuex"; import axios from "../plugins/axios"; Vue.use(Vuex); const store = new Vuex.Store({ state: { countries: [{ name: "United States of America", value: "us", }, { name: "Nigeria", value: "ng", }, { name: "Argentina", value: "ar", }, { name: "Canada", value: "ca", }, { name: "South Africa", value: "za", }, ], categories: [ "entertainment", "general", "health", "science", "business", "sports", "technology", ], }, mutations: {}, actions: { async getTopNews(context, country) { let res = await axios({ url: `/top-headlines?country=${country}`, method: "GET", }); return res; }, }, }); export default store;
We are adding two properties to our store, one of these properties is countries. This property contains an array of countries’ object. We also have the categories property; this contains an array of available categories on the News API. The reader will like the freedom to view the top news from specific countries and categories; this will also be needed in more than one part of the app and that is why we’re making use of the store. In the actions section of our store, we have a getTopNews method that fetches top news from a country(this country was passed from the component that called this action).
At this point, if we open our app, we should see our landing page that looks like this:
Updated landing page. (Large preview)
The background.js file
This file is the entry point for Electron into your app. It controls all the Desktop app-like settings for this app. The default state of this file can be found on my GitHub.
In this file, we have some predefined configurations set for the app such as the default height and width for your app. Let’s take a look at some of the things you can do in this file.
Enabling the Vuejs devtools
By default, you have access to dev tools in Electron but it is not enabled after installation. This is as a result of an existing bug on windows 10, so if you open you background.js file, you will find some commented out code with comments that state why they’re commented out:
// Install Vue Devtools // Devtools extensions are broken in Electron 6.0.0 and greater // See https://github.com/nklayman/vue-cli-plugin-electron-builder/issues/378 for more info // Electron will not launch with Devtools extensions installed on Windows 10 with dark mode // If you are not using Windows 10 dark mode, you may uncomment these lines // In addition, if the linked issue is closed, you can upgrade electron and uncomment these lines // try { // await installVueDevtools() // } catch (e) { // console.error('Vue Devtools failed to install:', e.toString()) // }
So if you’re not affected by this bug, you can uncomment the try/catch block and also search for installVueDevtools in this same file(line 5) and also uncomment it. Once this is done, your app will automatically restart, and when you check your dev tools, you should see the Vuejs Devtools.
Vuejs in devtools. (Large preview)
Selecting A Custom Icon For Your App
By default, the Electron icon is set as the default icon for your app, and most of the time, you probably would like to set your own custom icon. To do this, move your icon into your public folder, and rename it to be icon.png. The next thing to do would be to add the required dependency, electron-icon-builder.
You can install it using any of the following commands:
// With Yarn: yarn add --dev electron-icon-builder // or with NPM: npm install --save-dev electron-icon-builder
Once this is done, you can run this next command. It will convert your icon into Electron format and print the following in your console when this done.
Generated info in terminal. (Large preview)
The next thing would be to set the icon option in background.js file. This option goes inside the BrowserWindow option that is imported from Electron. To do this, update BrowserWindow to look like this:
// Add this to the top of your file /* global __static */ // import path import path from 'path' // Replace win = new BrowserWindow({ width: 800, height: 600 }) // With win = new BrowserWindow({ width: 800, height: 600, icon: path.join(__static, 'icon.png') })
Now if we run yarn run electron:build and view our app, we should see the updated icon being used as the app icon but it doesn’t change in development. This issue helps address a manual fix for it on macOS.
Setting Title For Your App
You will notice the title of your app is set to the app name (news-app in this case) and we’ll need to change it. To do that, we have to add a title property to the BrowserWindow method in our background.js file like this:
win = new BrowserWindow({ width: 600, height: 500, title: "News App", icon: path.join(__static, "icon.png"), webPreferences: { // Use pluginOptions.nodeIntegration, leave this alone // See nklayman.github.io/vue-cli-plugin-electron-builder/guide/security.html#node-integration for more info nodeIntegration: process.env.ELECTRON_NODE_INTEGRATION, }, });
Here, we’re setting the title of our app to ‘News App’. But if your index.html file has a title selected or your title doesn’t change to this, try adding this code to your file:
win.on("page-title-updated", (event) => event.preventDefault());
We’re listening for an event that gets fired when our title is updated from BrowserWindow. When this event is fired, we’re telling Electron not to update the title with the one found in index.html file.
Another thing that might be worth changing is the productName, this controls what name appears when you hover on your app’s icon or what your computer recognizes the app as. Right now, the name of our app is Electron. To change this name in production, create a vue.config.js file and add the following lines of code to it:
module.exports = { pluginOptions: { electronBuilder: { builderOptions: { productName: "News App", }, }, }, };
Here, we define productName to be ‘News App’ so that when we run the build command for our app, the name changes from ‘Electron’ to ‘News App’.
Multi Platform Build
By default, when you run the build command, the app that gets created is dependent on the platform that it is being run on. This means if you run the build command on LinUX, the app that gets created would be a LinUX desktop app. The same also applies to other platforms(macOS and windows). But Electron comes with the option to specify a platform (or two platforms) you want to generate. The available options are:
mac
win
linUX
So in order to build the Windows version of your app, run the following command:
// NPM npm electron:build -- --win nsis // YARN yarn electron:build --win nsis
Conclusion
The completed application can be found on my GitHub. The official Electron documentation provides information and a guide that helps you customize your desktop app whichever way you want. Some of the things I tried out but aren’t included in this tutorial are:
Customizing your dock on macOS — https://www.electronjs.org/docs/tutorial/macos-dock.
Setting resizeable, maximizable, and many more — https://github.com/electron/electron/blob/master/docs/api/browser-window.md#new-browserwindowoptions.
So if you’re looking to do much more with your Electron application, their official docs is a good place to start.
Related Resources
Node.jshttps://en.wikipedia.org/wiki/Node.js
Java (programming language)https://en.wikipedia.org/wiki/Java_(programming_language)
Electron (software framework)
JavaFX 14
electronjs
Electron Documentation
Vue CLI Plugin Electron Builder
Lazy Loading Images for Performance Using Intersection Observer by Chris Nwamba
axios
Getting Started With Axios In Nuxthttps://www.smashingmagazine.com/2020/05/getting-started-axios-nuxt/) by Timi Omoyeni
(ks, ra, yk, il)
Website Design & SEO Delray Beach by DBL07.co
Delray Beach SEO
source http://www.scpie.org/building-desktop-apps-with-electron-and-vue/
0 notes
Text
Building Desktop Apps With Electron And Vue
About The Author
Front-end developer based in Lagos, Nigeria. He enjoys converting designs into code and building things for the web. More about Timi …
Electron is an open-source software framework developed and maintained by GitHub. It allows for the development of desktop GUI applications using web technologies. In this tutorial, Timi Omoyeni explains what you need to keep in mind when building a desktop application with Vue.js using the Vue CLI Plugin Electron Builder.
JavaScript used to be known as the language for building websites and web applications especially with some of its frameworks such as React, Vue, and Angular but over time (as early as 2009), it became possible for JavaScript to run outside the browser with the emergence of Node.js, an open-source, cross-platform, JavaScript runtime environment that executes JavaScript code outside a web browser. This has led to the ability to use JavaScript for a whole lot more than just web applications, and one of which is building desktop applications using Electron.js.
Electron enables you to create desktop applications with pure JavaScript by providing a runtime with rich native (operating system) APIs. You can see it as a variant of the Node.js runtime that is focused on desktop applications instead of web servers.
In this tutorial, we’re going to learn how to build desktop applications using Electron, we’re also going to learn how to use Vuejs to build Electron applications.
Note: Basic knowledge of Vue.js and the Vue CLI is required to follow this tutorial. All of the code used in this tutorial can be found on my GitHub. Feel free to clone and play around with it!
What Are Desktop Applications?
Desktop applications are applications that run stand-alone in desktop or laptop computers. They are applications that perform specific tasks and are installed solely for this purpose.
An example of a desktop application is your Microsoft Word, which is used for creating and typing documents. Other examples of common desktop applications are web browsers, Visual Studio Code, and Adobe Photoshop. Desktop applications are different from web applications because you have to install the desktop application in order for you to access and make use of it, and they sometimes do not need internet access for them to work. Web apps, on the other hand, can be accessed by simply visiting the URL that such an app is hosted on and always need internet access before you can access them.
Examples of frameworks used in building desktop apps include:
Java Java is a general-purpose programming language that is class-based, object-oriented, and designed to have as few implementation dependencies as possible. It is intended to let application developers write once, run anywhere (WORA), meaning that compiled Java code can run on all platforms that support Java without the need for recompilation.
Java FX According to their official documentation, it is an open-source, next-generation client application platform for desktop, mobile, and embedded systems built on Java.
C# C# is a general-purpose, multi-paradigm programming language encompassing strong typing, lexically scoped, imperative, declarative, functional, generic, object-oriented, and component-oriented programming disciplines.
.NET .NET is a free, cross-platform, open-source developer platform for building many different types of applications. With .NET, you can use multiple languages, editors, and libraries to build for web, mobile, desktop, gaming, and IoT.
What Is Electron?
Electron is an open-source framework for building desktop applications. It was formerly known as ‘Atom shell’ and is developed and maintained by GitHub. It lets you write cross-platform desktop applications using HTML, CSS, and JavaScript. This means that you can build desktop applications for Windows, MacOS and other platforms using one code base. It is based on Node.js and Chromium. Examples of applications built with Electron include the popular Atom editior, Visual Studio Code, WordPress for desktop, and Slack.
Installation
You can install Electron in your project using NPM:
npm install electron --save-dev
You can also install it globally if you’re going to be working with electron apps a lot using this command:
npm install electron -g
Building Vuejs Apps For Desktop With Electron
If you’re familiar with building web applications using Vuejs, it is possible to build desktop applications using Vuejs. All you need for this is the Vue CLI Plugin Electron Builder.
The Vue CLI Plugin Electron Builder
This tool allows you to build Vue apps for desktop with Electron, this means that it makes your Vue application work as an electron app. This means that your Vue application which possibly is a web application can be extended to work in desktop environments without the need to build a separate desktop application in another framework. This gives Vue developers the option and power to go beyond the web. Going forward, you can work on that idea you have and give users a desktop application option — one that can run on Windows, macOS, and LinUX.
To see this in action, we’re going to be building a News app using the News API. The application will provide breaking news headlines and allow you to search for articles from news sources and blogs all over the web with their API. All you need to get started with them is your personal API key which can be gotten from here.
We’ll be building a simple app that offers the following:
A page that displays top and breaking headlines from a selected country with the option to choose a country using their /top-headlines endpoint. News API provides news from a list of countries that they support, find the list here.
News from a selected category using a combination of their /everything endpoint and a query parameter q with which we’ll specify our category.
After getting your API Key, we can create our application using the Vue CLI. Ensure you have the Vue CLI installed on your system, if you do not, install it using this command:
npm install -g @vue/cli # OR yarn global add @vue/cli
Once this is done, create your News app using the CLI:
vue create news-app
We’ll fetch the data from the News API by using Axios for this tutorial, but you can use any alternative you’re more comfortable with. You can install Axios by using any of the following commands:
//NPM npm install axios // YARN yarn add axios
The next step would be to set up an Axios instance for global config in our application. We’re going to be creating a plugins folder in the src folder where we’ll create this axios.js file. After creating the file, add the following lines of code:
import axios from "axios"; let baseURL = `https://newsapi.org/v2`; let apiKey = process.env.VUE_APP_APIKEY; const instance = axios.create({ baseURL: baseURL, timeout: 30000, headers: { "X-Api-Key": apiKey, }, }); export default instance;
Here, we define our baseURL and apiKey which we got from News API and pass it to a new instance of Axios. This instance accepts the baseURL and apiKey together with a timeout property. News API requires you to add your API Key when making a request to their API and offers 3 ways to attach it to your request but here, we’re adding it to the header X-Api-Key property after which we export instance. Once this is done, we can now use this config for all our Axios requests in our app.
When this is done, you can add the Plugin Electron builder with the CLI using this command:
vue add electron-builder
You’ll be prompted to select your preferred Electron version, I selected version 9.0.0 because it is the latest version of Electron (at the time of writing).
When this is done, you can now serve your application using this command:
Using Yarn(strongly recommended) yarn electron:serve OR NPM npm run electron:serve
This will take some time to compile and serve your app. When that is done, your application will pop open on your system, this should look like this:
Auto-open state of your electron app. (Large preview)
If you close the devtools of your app, it should look like this:
Landing page your app. (Large preview)
This electron plugin is super helpful and easy to use because every part of the development of this app works the same way as a Vue app. This means you can have one codebase for both your web application and desktop app. Our app will have three parts:
A landing page that renders top news from a country chosen at random.
A page for rendering top news from the user’s country of choice.
A page that renders top news from a category of the user’s selection.
For this, we’re going to be needing a header component for all our nav links. So let us create a file in the components folder and name it header.vue, and afterward add the following lines of code to it:
<template> <header class="header"> <div class="logo"> <div class="logo__container"> <img src="../assets/logo.png" alt="News app logo" class="logo__image" /> </div> <h1>News App</h1> </div> <nav class="nav"> <h4 class="nav__link"> <router-link to="/home">Home</router-link> </h4> <h4 class="nav__link"> <router-link to="/top-news">Top News</router-link> </h4> <h4 class="nav__link"> <router-link to="/categories">News By Category</router-link> </h4> </nav> </header> </template> <script> export default { name: "app-header", }; </script> <style> .header { display: flex; flex-wrap: wrap; justify-content: space-between; } .logo { display: flex; flex-wrap: nowrap; justify-content: space-between; align-items: center; height: 50px; } .logo__container { width: 50px; height: 50px; } .logo__image { max-width: 100%; max-height: 100%; } .nav { display: flex; flex-wrap: wrap; width: 350px; justify-content: space-between; } </style>
Here, we create a header component that has our app name and logo (image can be found on my GitHub) together with a nav section that contains links to the other parts of our application. The next thing would be to import this page on our layout page — App.vue so we can see our header on every page.
<template> <div id="app"> <app-header /> <router-view /> </div> </template> <script> import appHeader from "@/components/Header.vue"; export default { name: "layout", components: { appHeader, }, }; </script> <style> @import url("https://fonts.Googleapis.com/css2?family=Abel&family=Staatliches&display=swap"); html, #app { min-height: 100vh; } #app { font-family: "Abel", sans-serif; -webkit-font-smoothing: antialiased; -moz-osx-font-smoothing: grayscale; text-align: center; color: #2c3e50; background-color: #fff; } #app h1 { font-family: "Staatliches", cursive; } a { font-weight: bold; color: #2c3e50; text-decoration: none; } a:hover { text-decoration: underline; } a.router-link-exact-active { color: #42b983; } </style>
Here, we replace the default content in the template section with our newly created header component after we have imported and declared it in the script section. Finally, we add some styling for the whole app in the style section.
Now if we try to view our app, it should look like this:
Empty landing page. (Large preview)
The next step would be to add content to our Home.vue file. This page would host the first section of our app; Top news from a country selected at random. Update your Home.vue file with the following lines of code:
<template> <section class="home"> <h1>Welcome to News App</h1> <h4>Displaying Top News from </h4> <div class="articles__div" v-if="articles"> <news-card v-for="(article, index) in articles" :key="index" :article="article" ></news-card> </div> </section> </template> <script> import { mapActions, mapState } from "vuex"; import NewsCard from "../components/NewsCard"; export default { data() { return { articles: "", countryInfo: "", }; }, components: { NewsCard, }, mounted() { this.fetchTopNews(); }, computed: { ...mapState(["countries"]), }, methods: { ...mapActions(["getTopNews"]), async fetchTopNews() { let countriesLength = this.countries.length; let countryIndex = Math.floor( Math.random() * (countriesLength - 1) + 1 ); this.countryInfo = this.countries[countryIndex]; let { data } = await this.getTopNews( this.countries[countryIndex].value ); this.articles = data.articles; }, }, }; </script> <style> .articles__div { display: flex; flex-wrap: wrap; justify-content: center; } </style>
In the script section of this file, we import mapState and mapActions from Vuex, which we’ll be using later on in this file. We also import a NewsCard component (we’ll create this next) that would render all news headlines on this page. We then make use of the fetchTopNews method to fetch the latest news from a country selected at random from the array of countries in our store. This country is passed to our getTopNews action, this would be appended to the baseURL as a query for a country like so baseURL/top-news?country=${randomCountry}. Once this is done, we loop through this data and pass it to the article prop of our Newscard component in the template section. We also have a paragraph that indicates which country the top news is from.
The next thing would be to set up our NewsCard component that will display this news. Create a new file inside your components folder, name it NewsCard.vue, and add the following lines of code to it:
<template> <section class="news"> <div class="news__section"> <h1 class="news__title"> <a class="article__link" :href="article.url" target="_blank"> </a> </h1> <h3 class="news__author" v-if="article.author"></h3> <!-- <p class="article__paragraph"></p> --> <h5 class="article__published"></h5> </div> <div class="image__container"> <img class="news__img" src="../assets/logo.png" :data-src="article.urlToImage" :alt="article.title" /> </div> </section> </template> <script> export default { name: "news-card", props: { article: Object, }, mounted() { this.lazyLoadImages(); }, methods: { lazyLoadImages() { const images = document.querySelectorAll(".news__img"); const options = { // If the image gets within 50px in the Y axis, start the download. root: null, // Page as root rootMargin: "0px", threshold: 0.1, }; const fetchImage = (url) => { return new Promise((resolve, reject) => { const image = new Image(); image.src = url; image.onload = resolve; image.onerror = reject; }); }; const loadImage = (image) => { const src = image.dataset.src; fetchImage(src).then(() => { image.src = src; }); }; const handleIntersection = (entries) => { entries.forEach((entry) => { if (entry.intersectionRatio > 0) { loadImage(entry.target); } }); }; // The observer for the images on the page const observer = new IntersectionObserver(handleIntersection, options); images.forEach((img) => { observer.observe(img); }); }, }, }; </script> <style> .news { width: 100%; display: flex; flex-direction: row; align-items: flex-start; max-width: 550px; box-shadow: 2px 1px 7px 1px #eee; padding: 20px 5px; box-sizing: border-box; margin: 15px 5px; border-radius: 4px; } .news__section { width: 100%; max-width: 350px; margin-right: 5px; } .news__title { font-size: 15px; text-align: left; margin-top: 0; } .news__author { font-size: 14px; text-align: left; font-weight: normal; } .article__published { text-align: left; } .image__container { width: 100%; max-width: 180px; max-height: 180px; } .news__img { transition: max-width 300ms cubic-bezier(0.4, 0, 1, 1), max-height 300ms cubic-bezier(0.4, 0, 1, 1); max-width: 150px; max-height: 150px; } .news__img:hover { max-width: 180px; max-height: 180px; } .article__link { text-decoration: none; color: inherit; } </style>
Here, we display data passed into this component using the article object prop. We also have a method that lazy loads the images attached to each article. This method loops through the number of article images we have and lazy loads them when they become visible. Finally, we have styles targeted at this component in the style section.
The next thing will be to set up our store so we can start getting the latest news. Add the following lines of code to your index.js file:
import Vue from "vue"; import Vuex from "vuex"; import axios from "../plugins/axios"; Vue.use(Vuex); const store = new Vuex.Store({ state: { countries: [{ name: "United States of America", value: "us", }, { name: "Nigeria", value: "ng", }, { name: "Argentina", value: "ar", }, { name: "Canada", value: "ca", }, { name: "South Africa", value: "za", }, ], categories: [ "entertainment", "general", "health", "science", "business", "sports", "technology", ], }, mutations: {}, actions: { async getTopNews(context, country) { let res = await axios({ url: `/top-headlines?country=${country}`, method: "GET", }); return res; }, }, }); export default store;
We are adding two properties to our store, one of these properties is countries. This property contains an array of countries’ object. We also have the categories property; this contains an array of available categories on the News API. The reader will like the freedom to view the top news from specific countries and categories; this will also be needed in more than one part of the app and that is why we’re making use of the store. In the actions section of our store, we have a getTopNews method that fetches top news from a country(this country was passed from the component that called this action).
At this point, if we open our app, we should see our landing page that looks like this:
Updated landing page. (Large preview)
The background.js file
This file is the entry point for Electron into your app. It controls all the Desktop app-like settings for this app. The default state of this file can be found on my GitHub.
In this file, we have some predefined configurations set for the app such as the default height and width for your app. Let’s take a look at some of the things you can do in this file.
Enabling the Vuejs devtools
By default, you have access to dev tools in Electron but it is not enabled after installation. This is as a result of an existing bug on windows 10, so if you open you background.js file, you will find some commented out code with comments that state why they’re commented out:
// Install Vue Devtools // Devtools extensions are broken in Electron 6.0.0 and greater // See https://github.com/nklayman/vue-cli-plugin-electron-builder/issues/378 for more info // Electron will not launch with Devtools extensions installed on Windows 10 with dark mode // If you are not using Windows 10 dark mode, you may uncomment these lines // In addition, if the linked issue is closed, you can upgrade electron and uncomment these lines // try { // await installVueDevtools() // } catch (e) { // console.error('Vue Devtools failed to install:', e.toString()) // }
So if you’re not affected by this bug, you can uncomment the try/catch block and also search for installVueDevtools in this same file(line 5) and also uncomment it. Once this is done, your app will automatically restart, and when you check your dev tools, you should see the Vuejs Devtools.
Vuejs in devtools. (Large preview)
Selecting A Custom Icon For Your App
By default, the Electron icon is set as the default icon for your app, and most of the time, you probably would like to set your own custom icon. To do this, move your icon into your public folder, and rename it to be icon.png. The next thing to do would be to add the required dependency, electron-icon-builder.
You can install it using any of the following commands:
// With Yarn: yarn add --dev electron-icon-builder // or with NPM: npm install --save-dev electron-icon-builder
Once this is done, you can run this next command. It will convert your icon into Electron format and print the following in your console when this done.
Generated info in terminal. (Large preview)
The next thing would be to set the icon option in background.js file. This option goes inside the BrowserWindow option that is imported from Electron. To do this, update BrowserWindow to look like this:
// Add this to the top of your file /* global __static */ // import path import path from 'path' // Replace win = new BrowserWindow({ width: 800, height: 600 }) // With win = new BrowserWindow({ width: 800, height: 600, icon: path.join(__static, 'icon.png') })
Now if we run yarn run electron:build and view our app, we should see the updated icon being used as the app icon but it doesn’t change in development. This issue helps address a manual fix for it on macOS.
Setting Title For Your App
You will notice the title of your app is set to the app name (news-app in this case) and we’ll need to change it. To do that, we have to add a title property to the BrowserWindow method in our background.js file like this:
win = new BrowserWindow({ width: 600, height: 500, title: "News App", icon: path.join(__static, "icon.png"), webPreferences: { // Use pluginOptions.nodeIntegration, leave this alone // See nklayman.github.io/vue-cli-plugin-electron-builder/guide/security.html#node-integration for more info nodeIntegration: process.env.ELECTRON_NODE_INTEGRATION, }, });
Here, we’re setting the title of our app to ‘News App’. But if your index.html file has a title selected or your title doesn’t change to this, try adding this code to your file:
win.on("page-title-updated", (event) => event.preventDefault());
We’re listening for an event that gets fired when our title is updated from BrowserWindow. When this event is fired, we’re telling Electron not to update the title with the one found in index.html file.
Another thing that might be worth changing is the productName, this controls what name appears when you hover on your app’s icon or what your computer recognizes the app as. Right now, the name of our app is Electron. To change this name in production, create a vue.config.js file and add the following lines of code to it:
module.exports = { pluginOptions: { electronBuilder: { builderOptions: { productName: "News App", }, }, }, };
Here, we define productName to be ‘News App’ so that when we run the build command for our app, the name changes from ‘Electron’ to ‘News App’.
Multi Platform Build
By default, when you run the build command, the app that gets created is dependent on the platform that it is being run on. This means if you run the build command on LinUX, the app that gets created would be a LinUX desktop app. The same also applies to other platforms(macOS and windows). But Electron comes with the option to specify a platform (or two platforms) you want to generate. The available options are:
mac
win
linUX
So in order to build the Windows version of your app, run the following command:
// NPM npm electron:build -- --win nsis // YARN yarn electron:build --win nsis
Conclusion
The completed application can be found on my GitHub. The official Electron documentation provides information and a guide that helps you customize your desktop app whichever way you want. Some of the things I tried out but aren’t included in this tutorial are:
Customizing your dock on macOS — https://www.electronjs.org/docs/tutorial/macos-dock.
Setting resizeable, maximizable, and many more — https://github.com/electron/electron/blob/master/docs/api/browser-window.md#new-browserwindowoptions.
So if you’re looking to do much more with your Electron application, their official docs is a good place to start.
Related Resources
Node.jshttps://en.wikipedia.org/wiki/Node.js
Java (programming language)https://en.wikipedia.org/wiki/Java_(programming_language)
Electron (software framework)
JavaFX 14
electronjs
Electron Documentation
Vue CLI Plugin Electron Builder
Lazy Loading Images for Performance Using Intersection Observer by Chris Nwamba
axios
Getting Started With Axios In Nuxthttps://www.smashingmagazine.com/2020/05/getting-started-axios-nuxt/) by Timi Omoyeni
(ks, ra, yk, il)
Website Design & SEO Delray Beach by DBL07.co
Delray Beach SEO
source http://www.scpie.org/building-desktop-apps-with-electron-and-vue/ source https://scpie1.blogspot.com/2020/07/building-desktop-apps-with-electron-and.html
0 notes
Text
300+ TOP Framework7 Interview Questions and Answers
Framework7 Interview Questions for freshers experienced :-
1. What is Framework7? The Framework7 is a free and open-source mobile HTML framework. It is used to develop hybrid mobile apps or web apps for iOS and Android devices. It is compatible with other frameworks like also be like Angular, React. 2. In which year Framework7 was introduced? The Framework7 was introduced in 2014. Its latest version v3.1.1 was released on August 3, 2018, licensed under MIT. 3. What is the reason behind Framework7 popularity? The Framework7 is popular because of the following reasons: It facilitates you to develop apps for iOS and Android both. The learning curve for Framework7 is very easy. Framework7 has many pre-styled widgets/components. It has built-in helper libraries. 4. What are the main features of Framework7? Main features of Framework7: Framework7 is an open source framework, so it is free to use. Framework7 has easy and familiar jQuery syntax so you can learn it very easily. Framework7 has the built-in FastClick library, so it is very easy to control-click delay for touch UI's. Framework7 has built-in grid system layout for arranging your elements responsively. Framework7 dynamically loads the page from the template via flexible router API. 5. What are the advantages of Framework7? Advantages of Framework7: Framework7 is not dependent on any third party library. Framework7 has its custom DOM7 for DOM manipulation. Framework7 can also be used with Angular and React frameworks. Framework7 facilitates you to create apps once you know HTML, CSS, and some basic JavaScript. It supports faster development via Bower. It is easy to develop apps for iOS and Android without learning it. 6. What are the disadvantages of Framework7? Disadvantages of Framework7: Framework7 only supports platforms like iOS and Android. The online community support for Framework7 is not as broad as iOS and Andriod. 7. What are the several layouts for Framework7? Framework7 provides different types of layouts for your application. It supports mainly four types of Navbar/Toolbar layouts: Static Layout: The static layout is most often used layout type and includes navbar and toolbar which can be scrollable page content and each page contains its navbar and toolbar. Fixed Layout: Fixed layout uses its navbar and toolbar which can be visible on screen and cannot be scrollable on the page. Through Layout: In through layout, the navbar and toolbar appear fixed for all pages within a single view. Mixed Layout: This layout is a mix of all the above layouts in the single view. 8. What are Navbars in Framework7? There are three parts in navbars which may contain any HTML content in the following way: Left: It is designed to place backlink icons or single text link. Center: It is used to display the title of the page or tab links. Right: This part can be used similarly as left part. 9. What is the use of different navbars in Framework7? Following is a list of different navbars with details: Basic navbar: A basic navbar can be created by using the navbar, navbar-inner, left, center and right classes. Navbar with links: To use links in left and right part of your navbar, add tag with a class link. Multiple links: To use multiple links, add a few more to the part of your choice. Links with text and icons: The links can be provided with icons and text by adding classes for icons and wrapping the link text with the element. Links with only icons: Navbar links can be provided with only icons by adding icon-only class to links. Related app and view methods: On initializing the View, framework7 allows you to use methods available for the navbar. Hide navbar automatically: The navbar can be hidden/shown automatically for some Ajax loaded pages where a navbar is not required. 10. What are the toolbars in Framework7? Toolbars are used to provide easy access to other pages by using navigation elements at the bottom of the screen. 11. What are the different Framework7 toolbars to use? You can use toolbars in two ways as specified in the table. Hide Toolbar: If you want to hide the toolbar automatically when you load the pages, use the no-toolbar class to loaded page. Bottom Toolbar: Place the toolbar at the bottom of the page by using the toolbar-bottom class. 12. What are the different methods used with the toolbar? Following is a list of methods used with toolbars: myApp.hideToolbar(toolbar): It hides the specified toolbar. myApp.showToolbar(toolbar): It shows the specified toolbar. view.hideToolbar(): It hides the specified toolbar in the view. view.showToolbar(): It shows the specified toolbar in the view. 13. What is Search Bar in Framework 7? SearchBar is obtained in Framework 7 by using the SearchBar class. It is used for searching the elements. 14. What are the different SearchBar properties in framework 7? Following is a list of different SearchBar properties: mySearchbar.params: It represents the initialized parameters passed with an object. mySearchbar.query: It searches the current query. mySearchbar.searchList: It defines the search list block. mySearchbar.container: It defines the search bar container with HTML element. mySearchbar.input: It defines the search bar input with HTML element. mySearchbar.active: It defines whether the search bar is enabled or disabled. 15. What are the different SearchBar methods? Following is a list of SearchBar methods: mySearchbar.search(query): This method is used to search the passed query. mySearchbar.enable(): It is used to enable the search bar. mySearchbar.disable(): It is used to disable the search bar. mySearchbar.clear(): It facilitates you can clear the query and search results. mySearchbar.destroy(): It is used to destroy the search bar instance. 16. What do you mean by Content Block in Framework 7? In Framework 7, Content Blocks make you able to add extra content with a different format. It is generally used when you have much content of different types, and you have to put all on a page. For example: This is out side of content block!!! Sed ut perspiciatis unde omnis iste natus error sit voluptatem accusantium doloremque laudantium, totam rem aperiam, eaque ipsa quae ab illo inventore veritatis et quasi architecto beatae vitae dicta sunt explicabo. 17. What is Layout grid in Framework 7? The Framework7 provides different types of grid types for placing the content according to user needs. The layout grid is used to provide different types of columns size. 18. What do you know by Overlays in Framework 7? In Framework7, overlays are used to work with applications smoothly. Following is a list of some Overlays in Framework 7: Modal: Modal is a small window which is used to display content from separate sources without leaving the parent window. Popup: Popup is a popup box which is used to display the content when the user clicks on the element. Popover: It manages the presentation of the temporary content. Action Sheet: The Action Sheet is used to present the user with a set of possibilities for how to handle a given task. Login Screen: Overlay login screen displays login screen format which can be used in page or popup or as a standalone overlay. Picker Modal: Picker modal is used to pick some custom content which is similar to calendar picker. 19. What is the Progress Bar in Framework 7? The progress bars can be used to show the loading of assets or progress of a task to the users. The Progress bar can be specified by using the progress bar class. When the user doesn't know how long the loading processes the request, you can use progress bar-infinite class. 25% 50% 75% 100% For complete example: Click here. 20. What Is Accordion In Framework7? In Framework 7, the accordion is a graphical control element displayed as a stacked list of items. Each accordion can be expanded or stretched to reveal the content associated with that accordion. For complete example: Click here. 21. What are the different classes used for accordion in Framework 7? Following classes are used in Framework 7 accordion: accordion-list: It is an optional class contains the group of accordion items list. accordion-item: It is a required class for a single accordion item. accordion-item-toggle: It is a required class used to expand accordion item content. accordion-item-content: It is a required class used for hidden accordion item content. accordion-item-expanded: It is a single expanded accordion item. 22. What are the cards in Framework 7? The Framework 7 cards contain organized information related to a single subject like a photo, link, and text. Following is a list of Framework 7 card type: Card HTML Layout: The basic card HTML layout uses card classes to arrange its items. List View With Cards: You can use cards as list view elements by adding cards-list class to . 23. What is the use of the floating action button in Framework 7? The Framework7 Floating Action Button is used for promoted action. It is like a circled icon floating above the UI and has motion behaviors that include morphing, launching, and a transferring anchor point. There are 3 types of action buttons used in Framework7: Floating Action Button Layout: It is very simple. You have to place it as a child of page or view. Morph to Popover: If you want to open popover on clicking the floating action button, then you can use floating-button-to-popover class. Speed Dial: You can invoke related actions upon clicking the floating action button by using speed dial. 24. What are tabs in Framework 7? The Framework7 tabs are the set of logically grouped content that facilitates you to move between them and save the space like accordion quickly. Let's see the layout of a Framework7 tab: ... The content for Tab 1 goes here ... ... The content for Tab 2 goes here ... 25. What is the message bar in Framework 7? The Framework7 Message bar is a resizable toolbar for usage with messages. It provides a special resizable toolbar to work with the messaging system in the application. Syntax: Send 26. What is the picker in Framework 7? In Framework7, the picker is a very powerful component which facilitates you to choose any values from the list and also used to create custom overlay pickers. It looks like native iOS picker and can be used as an inline component or as an overlay. 27. What is the use of infinite scroll in Framework 7? The Infinite scroll is used when you want to load additional content and perform the required actions when the page is near to the bottom. Syntax ... Here: page-content infinite-scroll: It is used for infinite scroll container. data-distance: This attribute is used to configure distance from the bottom of a page (in px) to trigger infinite scroll event, and its default value is 50px. 28. What is the autocomplete in Framework 7? In Framework7, autocomplete is a mobile friendly and touch-optimized component, which can be a drop-down or in a standalone way. You can create and initialize Autocomplete instance by using the JavaScript method: myApp.autocomplete(parameters. Here, parameters are required objects used to initialize the Autocomplete instance. 29. How can we use the date functionality in Framework 7? The Framework7 provides Calender component which facilitates you to handle dates easily and can be used as an inline or as an overlay component. The overlay calendar converted to pop over on tablets automatically. myApp.autocomplete(parameters) Here, parameters are required objects used to initialize the Autocomplete instance. 30. What is hairline in Framework7? Hairline is a class. It is used to add 1px border around the images by using the border class. It contains the following rules: :after – This pseudo element is used for bottom and right hairlines. :before – This pseudo element is used for top and left hairlines. Framework7 Questions and Answers Pdf Download Read the full article
0 notes